Sample Collection
I suggest not only to play these mini-levels, but also to study carefully the source files, like script.txt and the project file of level ( . PRJ).
This is the easiest way to understand some complicated features of TRNG engine.
Remark: All demos have been developed only in source format (.prj and script.txt), for this reason you have to build script.txt copying script.txt and english.txt in SCRIPT folder, and then start NG_Center and click [Built] button.
Same speech for .prj files. Load the prokect in NGLE program and click on [Exit & Play] button.
If the demo contain two or more projects it's better using ngle only to perform an Output Wad, and when you created the .tom files for all projects, you can use NG_Tom2Pc.exe to load and built all .tom files of demo in same moment.
Please read always the Read_Me.txt file you find in all demos, some demos can work only from a given TRNG version.
For italians: Questa collezione di demo in italiano, in formato .pdf, tradotte da Franky
Animations with TRNG
Download: AnimationTutorial.zip (4 Mb)
This file joins together a little level project with an html tutorial about creation of custom animations with the TRNG engine.
You find the tutorial in another zip file named "Help_Animation_Command.zip", within the (above) AnimationTutorial.zip file.
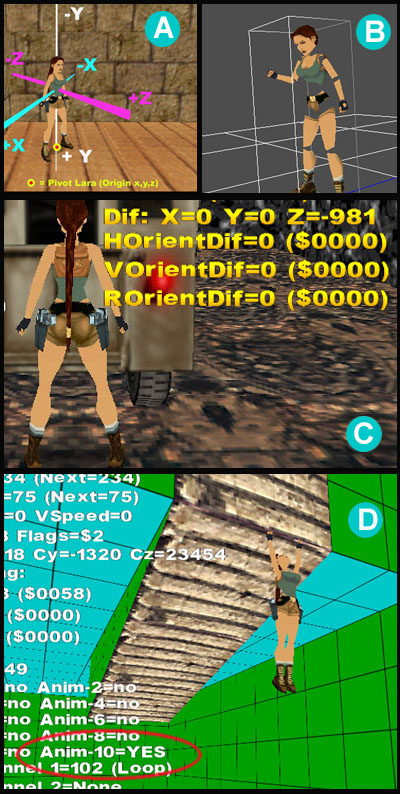
A) In the tutorial there are many techinical informations about how tomb4 handles the 3d world and the animations.
In picture A you can see the relative 3d axis used in tomb4.
In this tutorial you find also a full list of State ids values used in tomb4, other to many suggestions about troubleshooting with Animation command and TestPosition command.
B) Most of example are only a tehorical descriptions of Animation or TestPosition command, anyway you can find in this demo also a working example of fighting skills for lara.
Using the (non very fine) animation you see in Picture B, in this level you can kill a baddy only with fists.
C) Many examples show how use the new TestPosition command, useful to detect when lara is in front of some moveable, to interact with it.
For example in Picture C you can see how to use the diagnostic messages of TRNG, to discover the critical values to type in TestPosition command to discover when lara is in the (from you) wished position.
D) A lot of example try to describe the usage of Animation command, and in particular way, how to set the correct ENV_ (ENVironment) constants to detect if the situation in game is valid to start your custom animation.
In picture D you can see when the ENV condition ENV_HOLE_IN_FRONT_CEILING_CLIMB is active.
Since, there are dozen of ENV conditions, I tried to concentrate my attemption only on more complicated conditions, trying to explain them with correct script command and images.
Boats
Download: Boats_new.zip (1.78 MB)
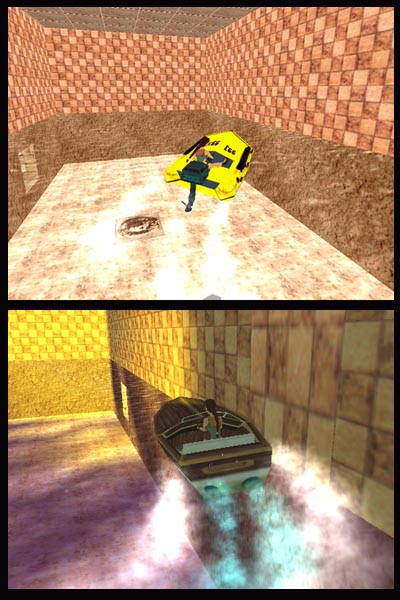
In this demo you find rubber boat and motorboat in same level.
The motorboat has the light only because in its OCB has been set the value "1", but also with rubber-boat you can do the same, if you wish.
Remarks:
1) This project has been changed respect that of 2008. Now there is no AssignSlot command in script.txt, and the wad has four new slots to host rubberboat and motorboat with respective lara's animations slot.
2) The bug about bad sound when lara swim underwater has been fixed but you need to use version 1.2.0.1 or higher to compile the script.txt of this demo.

Cameras Demo
Download: Cameras.zip (101 Kb)
This sample shows different ways supplied by TRNG to change camera modes in game.
You can look lara or enemies from different positions.
You should use default tga and objects (.wad) of Karnak level for this sample.
Remember to build script.txt: copy script.txt and english.txt in SCRIPT folder and then start NG_Center (or click on [Reload] button if it was already opened) and build the script.
All triggers for camera effects are placed on sectors with a texture showing a cat face.
Remark: This sample has been changed respect old version of 2008.
Now, at start, there are some new examples about usage of new flipeffect trigger: "Camera. Change camera mode with <&>Parameters for (E)time"
This method is more easy to build but it has the disvantage to don't allow to use it for enemys but only for Lara.
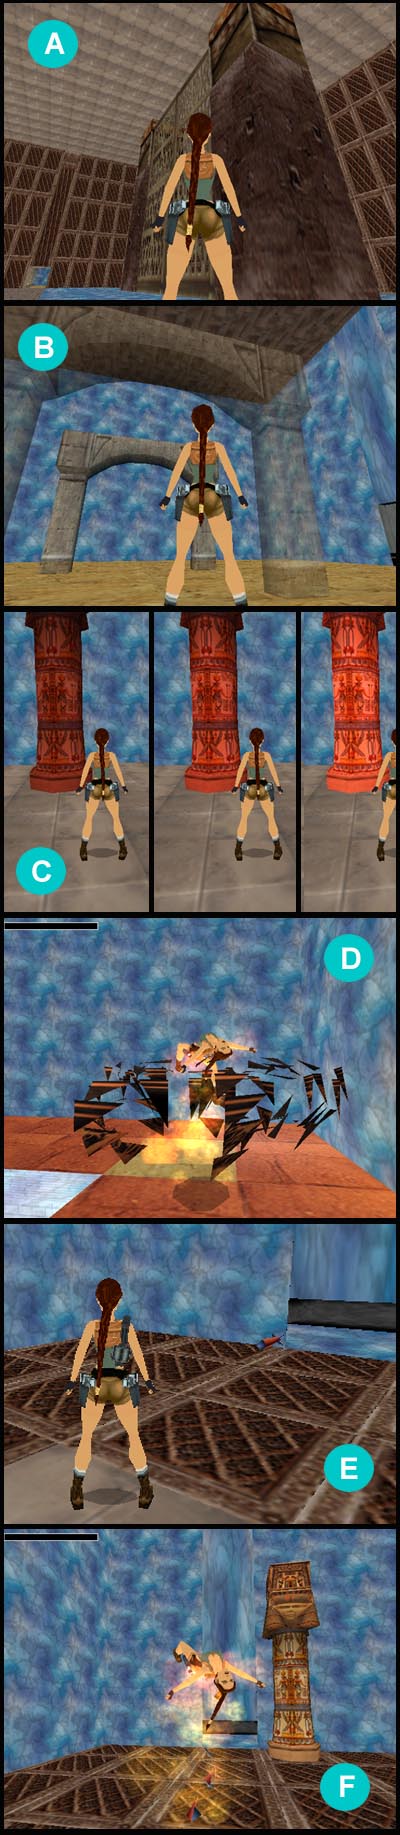
A) First examples are about new SET_CAMERA feature.
With this method you can change the normal camera that follows always Lara, setting a different position and angle for it, so to look lara from a different position.
In picture A you can see lara looked from front/down.
B) In picture B there is another SET_CAMERA setting: lara will be looked from up/front position
C) In picture C it has been used the other method to change the framing of lara. From this example it will be used the method to force a real fixed camera you placed in the level, to follow lara, framing her from a given position.
In picture C you can see the fixed camera following lara from upstairs
D) In picture D you can see the effect named "Lara's Portrait", it has the same layout of Picture B but it has been get with old flipeffect Lara portrait and an external camera, while in B picture has been used a SET_CAMERA.
When you want frame lara it's better using the SET_CAMERA mode because it's more easy and because this method is more able to avoid obstacles (walls, ceiling, statics) than "Lara's portrait" effect.
We could say that the "Lara's portarait" effect is by then an obsolete method to look lara, since the new flipeffect "Change camera mode" + set_camera is more effective.
E) In picture E you can see the Enemy Portrait effect
This effect look the wished enemy in front and follow its movment from this position.
The camera could have troubles in very short spaces, for this reason I suggest to study very well when and where place this kind of effect.
F) In picture F you can see a "Matrix effect", the name borns from famous "Matrix" movie.
The camera turns fastly arond lara while she reamins still.
It could be a good way to show the skin of lara and in same moment the level scene.
I suggest to use the Matrix effect togheter with keyboard disabling to force lara to reamin still, because if lara is moving the resulting effect is not good but only a bit chaotic
G) In picture G you can see the "Follow-me camera effect" for enemies.
This camera works like the follow camera for lara but in this case it will an enemy to watched.
Remark: all effects have as target an enemy should be used only for few seconds, because until they are working, the player will have no chance to understand the position of Lara.
Chronicles Objects
Download: Chronicles.zip (3.8 MB)
This project requires a dll with version 1.2.1.7 or higher.
From version has been added some objects of TR Chronicles adventure.
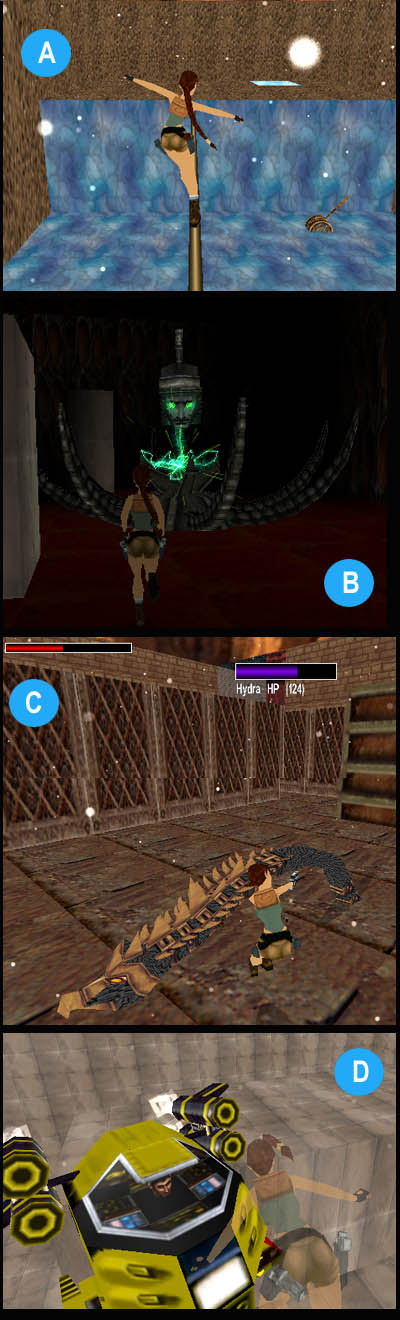
In picture A you can see the tight-rope.
Setting the correct OCB values you can set the grade of ability required to pass over it: -1 for kids (lara cann't fall), 0 = standard like in TR Chronicles, 1 = Hard Mode, 2 = Very hard mode, 3 = impossible mode.
In picture B you can see the Guardian, named in some unofficial tools like Laser Head.
Placing the Guardian require some care, see the readme.txt file.
The Guardian shots green laser ray from his eyes: the laser kill lara immediatly.
In Picture C there is the Hydra.
She shots different energize balls (settable via OCB) and heart lara with her beak.
In Picture D there is the enemy sub-marine.
It moves in the water and tries to hit lara with a torpedo missile.
In zip file you find a playable level with all these new objects with all new sounds used by them.
Collisions under TRNG
Download:Collisions.zip (3.4 Mb)
From version 1.2.1.5 there are new collision feature in trng.
Remark: if you are interested to the collisions, look also for the Miscellanous 2 demo in this page, where you can find the new bridge collisions.
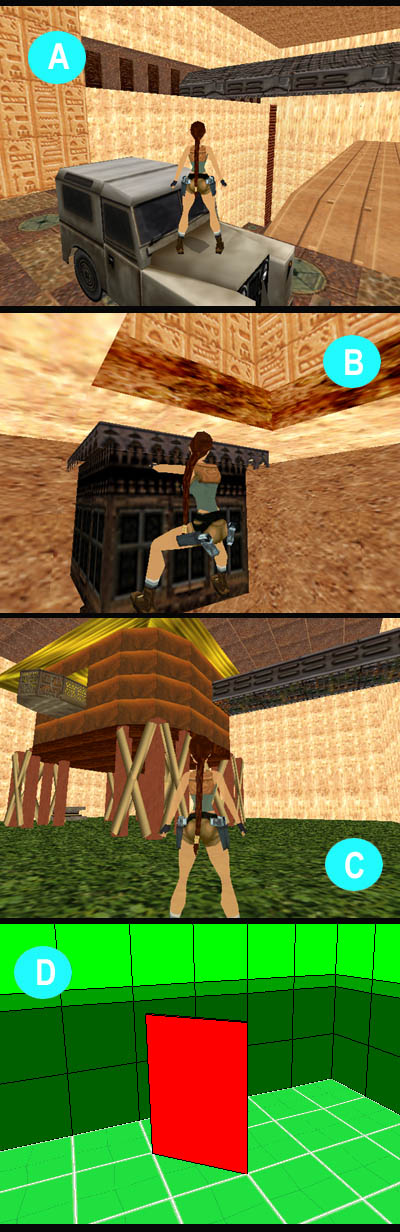
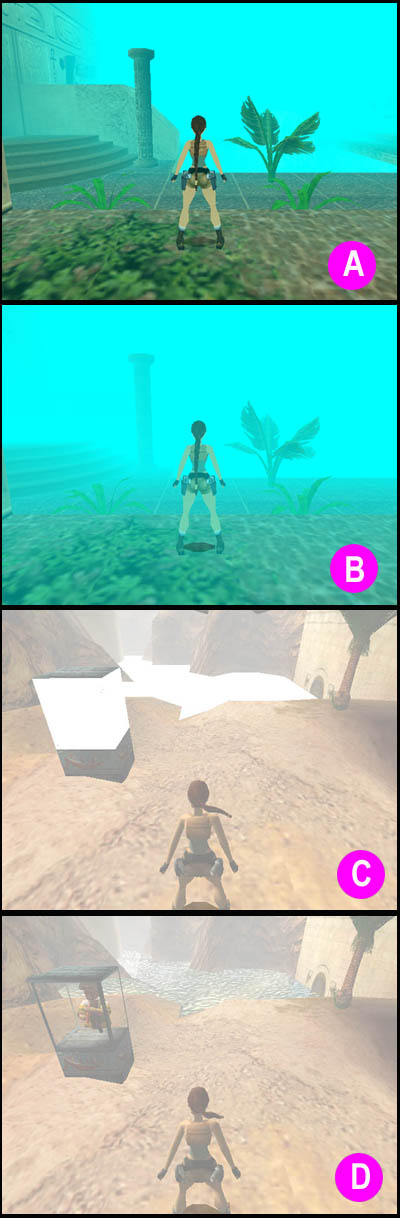
Now you can create invisible collisions in your level and, using this trick, you can permit to Lara to walk (Picture A) or climb (Picture B) on static and moveable objects.
Thanks to this chance we can also create a cabin like that in Picture C, where lara can enter, finding correct collision on all walls in spite it is hanged in the space and it has been made only with static objects and invisible collisions.
In the collis.wad file you find also a set of new objects: the collision panels.
They are a set of invisible panels (picture D) to integrate the room collisions created with the new "Collision. ..." flipeffects.
The new collision panels have own slot name in the wad: PANEL_BORDER, PANEL_MIDDLE, PANEL_CORNER, PANEL_DIAGONAL, PANEL_STRIP, PANEL_HALF_BORDER1, PANEL_HALF_BORDER2, PANEL_MIDDLE_CORNER.
With above panels you can create easily diagonal collisions and other detailed shapes.
For example in the cabin I used the invisible panels only to round the collision of the balcon, while the other collision have been created using the "collision" flipeffect triggers.
In this zip file you fin also an html tutorial about the new collision feature.
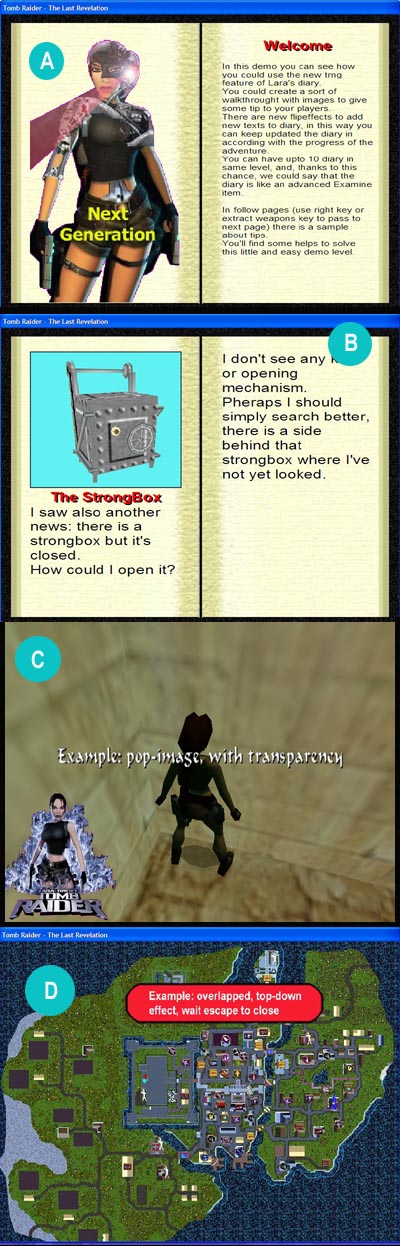
Diary and Images
Download: Diary_Images.zip (5.9 MB)
This sample shows how using Diary object (Picture A and B) and how showing images in game (Picture C and D).
With Lara's diary you can show texts and images formatted in different ways.
You can also add new pages using some flipeffect triggers, to keep the diary updated with the progress of the adventure.
To enable and customize diary you have to use the new script command named Diary=.
You can choose windows fonts to use, colors and layout about position of text frames and image frame.
About images, there are two different kinds of image: the pop-up images (picture C), where the image covers only a little side of screen while the game goes on, and the overlapped images (picture D).
The overlapped images usually will cover whole screen and (always) the game will be frozen until the image remain on the screen.
In this sample it's important read the "read_me.txt" file because there are some news about installation of .bmp images.
The .bmp images used by trng have to be copied in PIX subfolder of TRLE folder and they must be in bitmap RGB format with names like "image1.bmp", "image5.bmp" ect.
Remark: some images in this sample are in jpg format to reduce the size of zip file. You can translate them in correct bmp format simply extracting the converter.exe utility in same PIX folder of images and the launch this converter.exe utilty.
Also in your level you are free to add this utilty to develope images in jpg format but giving an easy way to final players to reconvert them in bmp format.
If you have TRLM 2009 you can play this demo simply adding this zip file in trlm with Add New Level command in usual way.
Don't consider the "install_level.txt" file you find in the zip file. It used only from Tr Level Manager 2009 to install correctly this level.
Drones Plugin
Download: SetupFiles.zip
To import in Plugin panel of NG_Center, to use drones features in your levels.
Download: Drone_Demo_ngle_project.zip
Source files (.wad, .prj, .tga, script.txt) to build drone demo level.
Download: Installer of Demo Level (26 MB)
To play immediately the demo. The setup will create a little trle folder with all needed files
Read now: Drone Help + Tutorial for Demo Level
It describes how drone works, its features and there is a description also about the building of puzzles of demo level.
(Note this help is also present in SetupFiles.zip and it will be available in Plugin panel of NG_Center program.)
With a drone lara could explore some part of a level but the drone is also able to interact with many items.
It could pick-up keys or other little item (if you enable the magnet).
With some coding via script, the drone could engage triggers and switches, kill enemies and many other stuff.
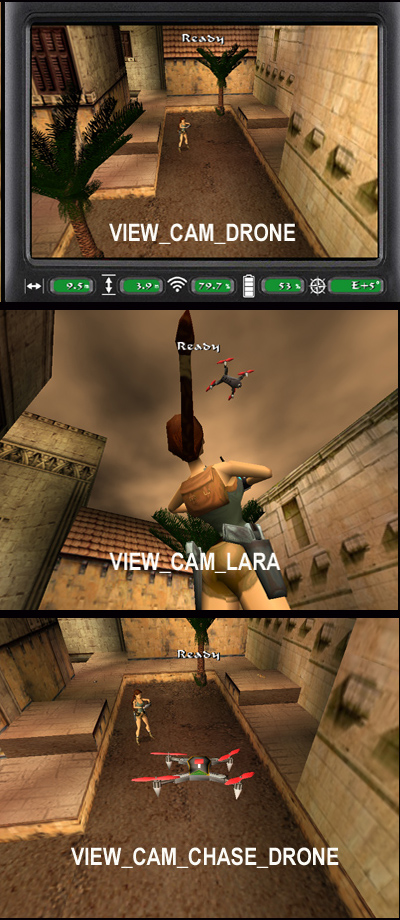
There are three different views, (se left picures)
A view to see what drone is looking at (VIEW_CAM_DRONE), usually called FULL FPV (FPV = First Person View)
A view where you see also the drone and what it is looking at (VIEW_CAM_CHASE_DRONE)
A view where it is Lara to look at drone (VIEW_CAM_LARA)
This view should be engaged only in take off phase, when the drone is very close to Lara, of course.
In any moment it's possible swap between above three view modes with space bar (draw weapon) command.
Some features of this Drone
The drone is foldable and Lara could pickup up it and brings with herself, in her bodybag.
The drone use little batteries that, technically they are pickup items, so Lara could (and she should) pickup up and collect them, to have many flights.
The drone is able to float over water and, for this reason, it could be picked also while it's floating on water surface.
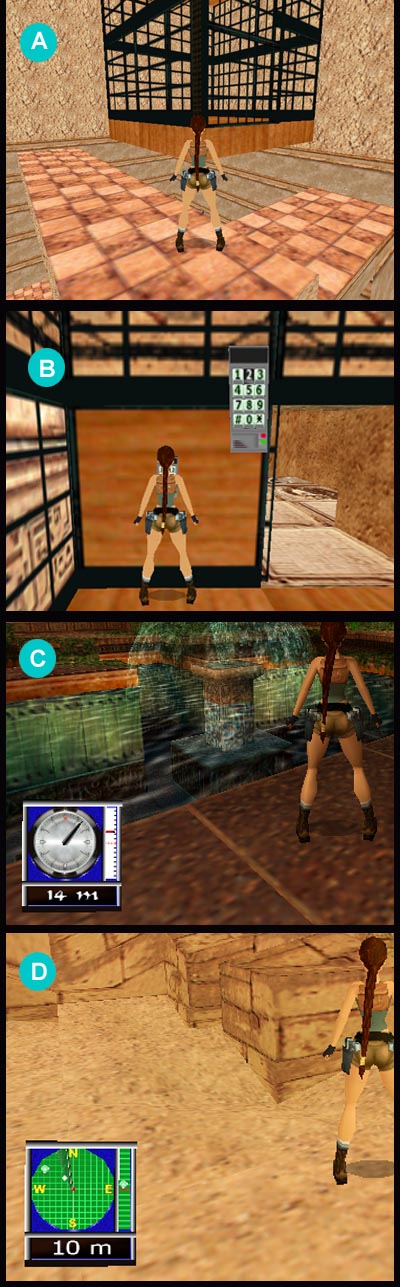
Elevators and Detectors
Download: Elevator_Detectors.zip (5.98 Mb)
This demo contains four projects to illustrate the usage of:
A) Stop and Go Elevator.
This elevator has no keypad, it runs endless up and down, stopping for some second for each floor, opening and closing the door byself.
B) KeyPad Elevator.
This elevator is more traditional. Lara enters and choose with keypad the wished floor, the door will be closed and the elevator will move to reach the wished floor.
C) Pointer Detector.
The detector is a fully new object for all tomb raider saga.
This work like an avanced radar to discover the position (north/south/east/west), height (up/down respect to lara) and distance in meter of some target.
In script you can set the target and working mode.
The pointer detector allows to monitor only a single target for time, but when first target has been picked up or killed, the detector can start to monitor another object of the list you typed in script.txt file.
D) Radar Detector
The main difference of Radar Detector respect that Pointer Detector, is that, with Radar detector you can monitor many targets in same time, if they enter in the range of distance you set in script.txt file
Remarks about Detectors:
1) The detector object is always in slot Quest1, usually used by Amulet of Horus.
2) If you want move Radar detector in your wad remember to copy also the MISC_SPRITES slot, because it contains some little sprites used to show the found items on the detector (those little blinking lights)
Read description of Detector script command for more infos.
Remarks about Elevators:
1) The "Stop and go" elevator, has invisble collision panels placed around it to avoid that lara may falls out.
There are two kind of invisible panels: the Animating1 and Animating1_Mip.
The difference is their size, the first has size 1x2 sector (2 is the height in vertical), while the other has a size of 1x1 sextor.
2) The "Keypad Elevator" has no moving door, while the "Stop and go" elevator has a fake (simulated) door using the animating2.
Read description of Elevator script command for more infos.
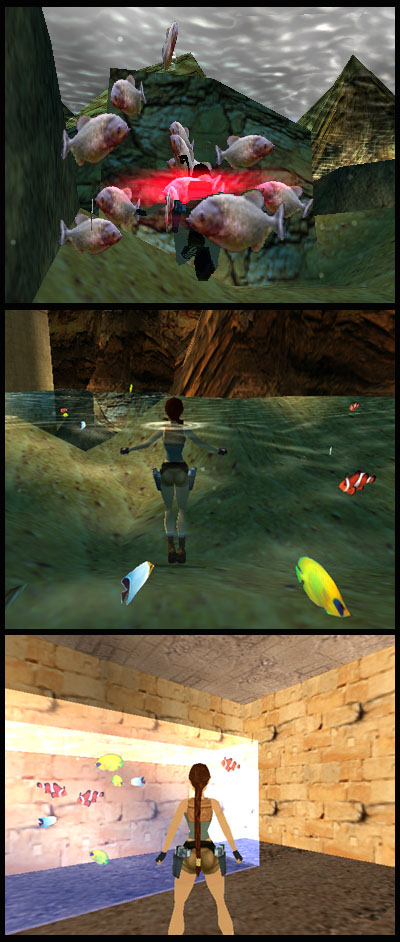
Fish and Pirahnas
Download: Fish_and_Pirahnas.zip (3 MB)
The fish object is an emitter, like the locust emitter or little beetles emitters.
You place it in the project, set via OCB the number of fish you wish and then trigger it in game to emit the wished number and type of fish.
Plase, note this fish emitter is not really the same you saw in tomb raider 3 but it is a new object created by me (paolone) to reproduce behaviors alike that in tomb raider 3.
There are some difference between the trng fish and tr3 fish: with trng fish you can choose between four different kind of fish: pirahnas, clown fish, butterfly fish and angel fish.
You can set if the fish will work within a shoal or like single individuals.
You can choose also other behavior of fish: if they will be able to jump (temporary) out of the water, it they will attack lara or less ect.
Study the OCB for FISH_EMITTER object in the Reference panel of NG_Center program, in the "OCB List" section to know all available OCB values for fish.
In this project you can find three demonstration about usage of fish: the first sample is for tropical unoffensive fish: butterfly, angel and clown fish will swim close to lara without injuring her.
The second sample show the pirahnas and they will injre lara, of course.
The pirahnas have beet set to work in a shoal.
The third example show some tropical fish in an aquarium. In this case you see also a way to build a litle water room (the aquarium) rounded by other dry rooms.
For aquarium fish I used the ocb value SLOW to get the fish compatible with a so reduced water space.
Try to find and walk on azure texture to enable the three different samples in this demo level.
Remark: in this demo you can find an example also about usage of graphical ammo counter, the swapping of horizont item and about the new still collisions.
FMVs: Video Cutscenes
Download: video_fmv_cutscenes.zip (22 MB)
Remark: follow the installation infos in Read_me.txt file you find in above zip file.
This demo has a big size (22 Mb) because it contains three FMV videos of about 1 minute for each.
Since the common usage of FMVs in game is easy, I tried to use this sample project to explain some little tricks to reach common targets about fmv management.
1) Starting a video at begin of Level
Remark: see Room0 for this example.
If you want have a video introducing the begin of a level, i.e. a video starting before of the level, you can see the example of first fmv. This fmv will be played before the level was visible.
2) Perform a change in game when a fmv has been completed
Remark: see Room0 for this example.
In most cases we use a video to illustrate some important facts happened in game, for this reason at end of the fmv we should set some change in game to give a sense to our fmv.
3) Play a video at end of current level and first of loading another level.
When you mean have a final fmv for your level and having the loading of next level immediatly at end of the fmv, you can follow the example in room 54.
Fog Distance tutorial
Download: Fog_Distance_Tutorial.zip (381 Kb)
From version 1.2.1.0 some bugs about fog distances have been fixed.
In this tutorial you can find many example and suggestions about correct settings for distance fog.
In the html file there are images with different settings (See pictures A and B).
There is an introduction also about new flipeffect triggers to create dynamic fog effects to simulate desert storm.
You can find also the info about how fixing the bug about excessive saturation of transparent texture with fog color (see picture C)
Using the new fixing you can remove that bug and so you can use freely the fog distance also in ambients with water (see picture D).
Harpoon and Frog-Man
Download: Harpoon.zip (2.4 Mb)
UPDATE! Download New Frogman (with new fixed collision boxes)
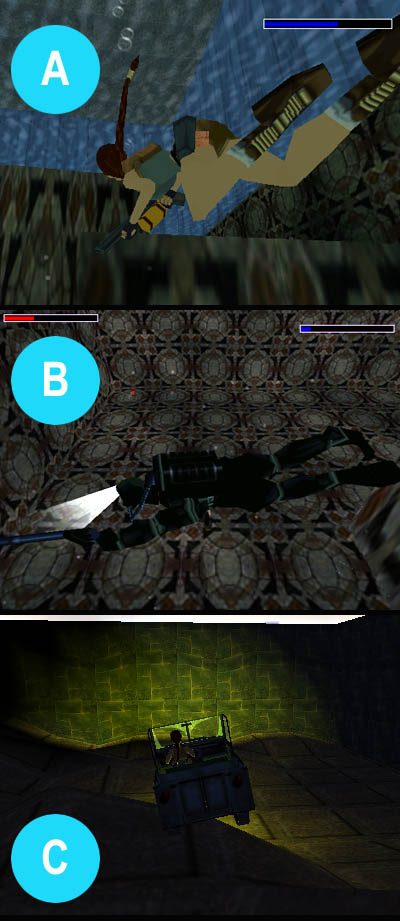
From version 1.2.1.8 it's available the Harpoon gun of Tomb Raider 3 for Lara (picture A).
You can set the ammo number and type for harpoon with the Customize=CUST_HARPOON script command.
See also the script.txt of current demo.
In this demo there is also another news of 1.2.1.8 dll: the Frog-man enemy (picture B).
From 1.2.1.8 version you can also enable the beams of the Jeep (Picture C) or disable the beam of the sidecar. In both cases you can set these changes typing the OCB 1 in the jeep or the sidecar, while letting "0" as ocb these vehicles will work in common way.
Input Box and Static Mips
Dowload: plugin_obj_demo.zip (3.9 MB)
Download: inputbox_staticmip.zip (4.4 MB)
In this InputBox-StaticMIP demo level, there is a demostration about usage of StaticMIP command to improve performances (and to reduce slow-down) when there are many static objects in same wide-scene.
The idea is to create a bad-copy of some statics, chosen between that are in big quantity or for their high number of vertices or semitransaprent textures.
The approach to use is different, in according with kind of static:
- When the object has a squared shape, like furnitures or machinary, the best approach is to reduce automatically (using some 3d editor like metasequoia), the number of vertices, keeping about same shape and color pattern.
- While, when the object has a particelar shape, like tree or plants (using transparent textures or a lot number of little meshes), it's necessary another approach...
If our level has a sort of forest, with many trees and bushes, the risk of slowdown is very high, since dozen of statics with many vertices and transp textures, should be drawn in game in same moment.
In this situation the StaticMIP command is the solution.
Since, when the forest (or most of it) is very far at horizont, we'll see only the outline and pattern color of these (very far) trees, we can replace these plants with a bad-copy, to show only when they are at given (very far) distance from source view.
To get this "only-outline shape and right colors" object, it should be better using a sort of sprite, rather a low-defined 3d object, since, in this last case, the change of branches outline it could be noticed also from far distance.
Therefore, to solve the problem, we'll use another method: two crossed faces (doubleside faces) with painted over the shape of that plant.
Since they (the plants) will be drawn in game only when they are very far, it will be not necessary that these bad copies had an high definition, since they will be, on screen, like a little colored spot, with a given contour.
Credits
Credits for Teme9, creator of some plants used in this demo.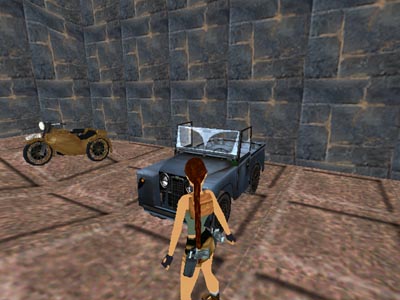
Jeep and Side-Car
Download: JeepBike.zip (2.1 MB)
The jeep and the side-car vehicles are not a big news in tomb raider level editor, anyway in this case the news is to may use both vehicles in same level.
To realize this result you have to insert a script command to move jeep key in other slot, to avoid the overlapping with Nitrous Oxide Feeder item, used by sidecar.
While for other conflict: the vehicle extra slot used to store lara animations for both vheicles, now you can place the lara animations for side-car in a new slot.
In this way you can have both vehicles in same level.
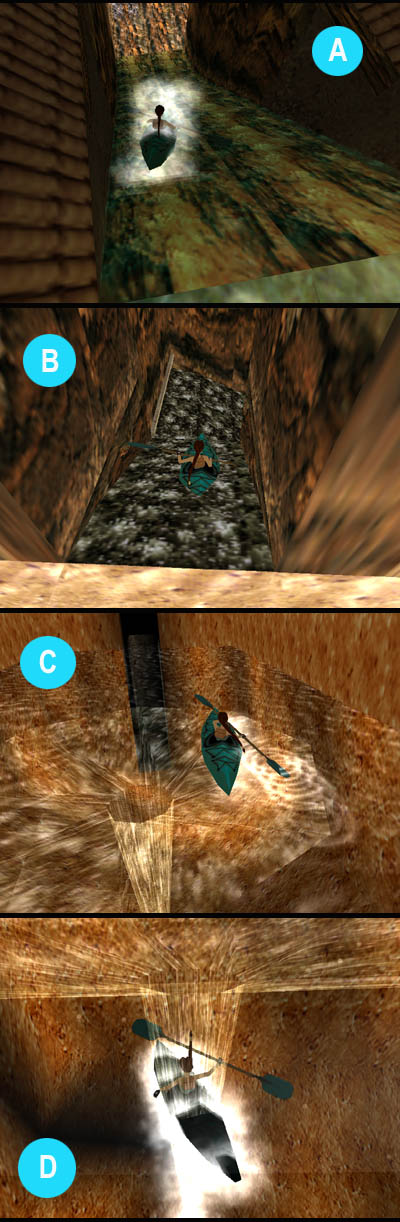
Kayak
Download: Kayak.zip (3.6 MB)
The kayak has been imported from Tomb Raider III, the Mudubu level.
With kayak, differently by motor-boat and rubber-boat, it's possibile go down from rapids (Picture A).
In this level you find two different types of rapids, with transparent waterfall (picture A), or opaque waterfall (picture B).
You can set different OCB for kayak to enable some features, like "look-at" feature, mist effect on the rapids or in the normal moving.
In this demo you find also an example of the new pool-whirl efffect (picture C), where Lara (with kayak, motorboat, rubber-boat, or stand-alone) could be sucked in it (picture D), killing her.
Some OCB codes of kayak are used to enable new go-on-board custom animations.
The speech is a bit complicated so if you are interested you should read carefully the OCB for kayak in OCB DESCRIPTION section of Reference panel of NG_Center program.
Like for other demos, you can use all objects you find in enclosed wads.
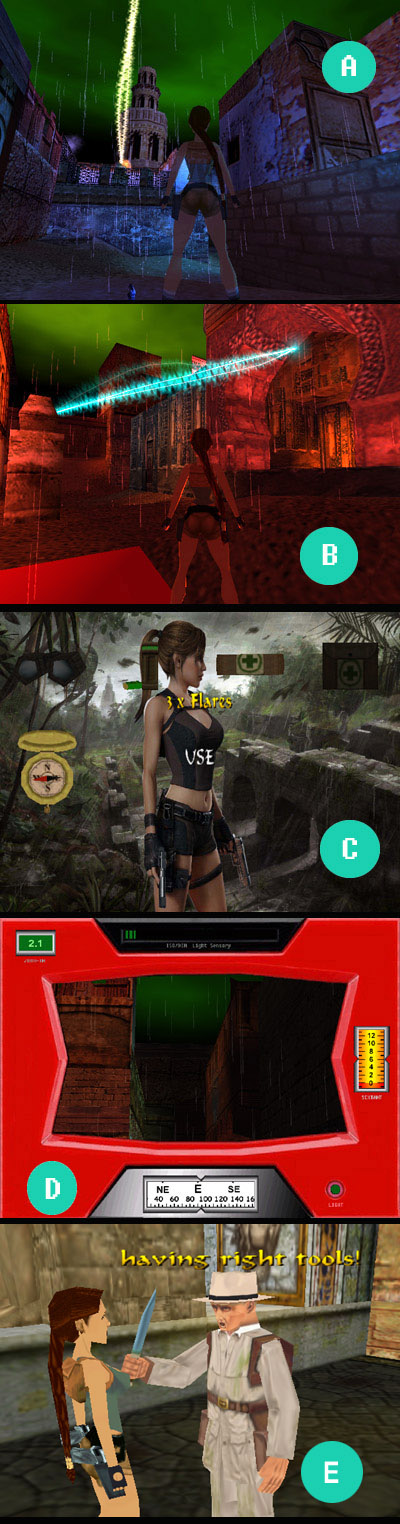
Lightnings and Cutscenes
Download: Lightnings and Binoculars (Sources) (16 MB)
Download: Cutscenes and Demos - Binary, playable demo (53 MB)
The 1.2.2.7 release had a long production time and for this reason there is a very long history with fixing of many bugs, and many adding of new features.
In this page there is only a little summary of these news.
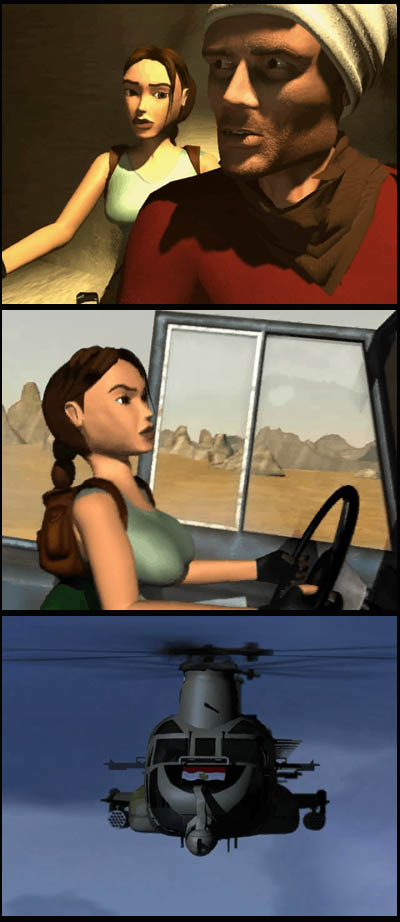
From 1.2.2.7 trng version, has been added the lightning effect.
You can customize it in many ways: to do work it like lightnings from the sky in random way (A Picture), or like am electric conductor between two given points (B Picture).
With 1.2.2.7 version you can also add background images to loading level screen, inventory screen and pause/options/statics screen (C Picture).
There is a new customize for binocular (D Picture), where you can, other to add a new graphic/image mask, show infos about compass data, sextant (to discover vertical rotation of the view, zoom factor and sensory of lightness.
More, you can set some flag, in binoculars customization, to modify the speed of zooming in/out and to increase the max zoom factor, from the old (about 4 x) to the new of 40x.
There are many other new skills in 1.2.2.7 version, the most importants are the followings:
* Added new setup window in tomb4.exe.
Now you can start setup, keeping down the CTRL key while the game is starting up.
In the setup windows there new emergency settings to fix problems with images, movies, slowing down or flickering.
Some of these emergency settings are very important to fix troubles under Windows7/8 operative systems and images or FMVs.
* Added some directive to NG Center to include files (#include), define temporary constants (#define), to get more clean and well-sorted the script.
* In NGLE (new room editor) has been added a customizable new window where you can add buttons to reproduce skills about well-known commands of the program. Using buttons as shortcuts for keyboard or menu commands to get them more fast and easy.
* In NG Center have been increased max number of occurences for many script commands: TriggerGroup, GlobalTrigger, Organizer ect.
Pratically now you can type a most number of these commands in same level section.
* Now you can use eastern charset in tomb raider level. This means you can use chinese, japanese, turkish or russian characters (and many others) to show texts in game.
* Added new text effects like: flying text (where the text is at begin very little and its size grows fastly), blinking text (changing the size big/little in ritmic way), or changing color (where different nuance of colors will be changed in fast way for same text).
* Fixed many bugs about: Elevator, CUST_KEEP_DEAD_ENEMIES, explosion of dogs and mummies, extension of dynamic lights number (now it works with 127 lights versus the old 32 lights), little (useless) button over ng_center window, binoculars with keyboard commands for inventory, pause screen, Diary for font size, showing images, lasersight mode, flyby triggers ect. ect.
* It has been addes a complete set of new skills to manage cutscenes (E Picture): now you can change heads of lara and other enemies to simulate speeching or other moods. You can use a "cutscene" camera to change quicly and easily view for different actors.
The new demo recorder allows to you to show from title many suggestive scenes of your adventure in advance.
* It has been added to "Tools3" panel the audio converter tool to convert wav files in right format for sound/samples folder, or to convert from mp3 and wav and viceversa.
* In NGLE has been added a new setting to improve the speed of drawing rooms in Draw Room mode.
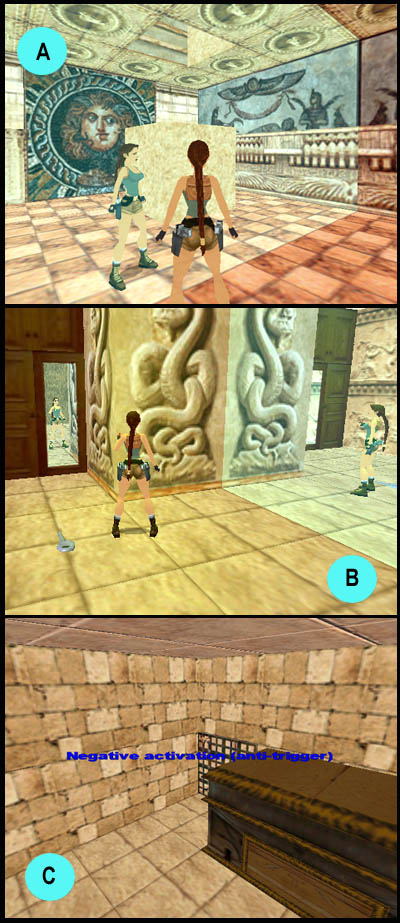
Mirrors
Download: Mirrors.zip (1.04 Mb)
REMARK: see also the: New Mirrors (3.19 MB) demo.
You can see the description of new mirrors scrolling down this same page.
In this demo, you can see some new kind of mirrors that you can create with TRNG:
A) Horizontal Mirror.
This mirror is very similar than old mirror you can see in coastal, but in this case you can duplicate also other moveable, and they will be moved and animated in specular way like if they were really reflected by mirror.
In image A you can se lara while she is pushing a pushable object while in mirror room another lara push the same pushable object.
In same picture you can see the mummy, in main room and in reflex room.
To realize this target it's necessary set a correct Mirror script command where you type the indices of moveable (in main room) to duplicate in hidden room.
See description of Mirror script command for more infos.
B) Horizontal Reverse Mirror.
In picture B you can see another horizontal mirror but in this case the reflection is inverted, like it happened in old tomb raider 1, when Lara met her alien clone.
Also in this mirror type you can set moveable (the skeleton in B picture) and also them will be moved in inverse mode.
C) Floor Mirror
In picture C you can see a floor mirror.
D) Ceiling Mirror.
In picture D you can see the ceiling mirror.
This mirror is a bit boring because with look command lara is not very able to see her on the ceiling.
If you wish use this kind of mirror, I suggest to modify the view camera in that situation, using a fixed camera or some new trng feature to inquadrate lara from different position, to get to see in better way the real lara and reflected lara in same time.
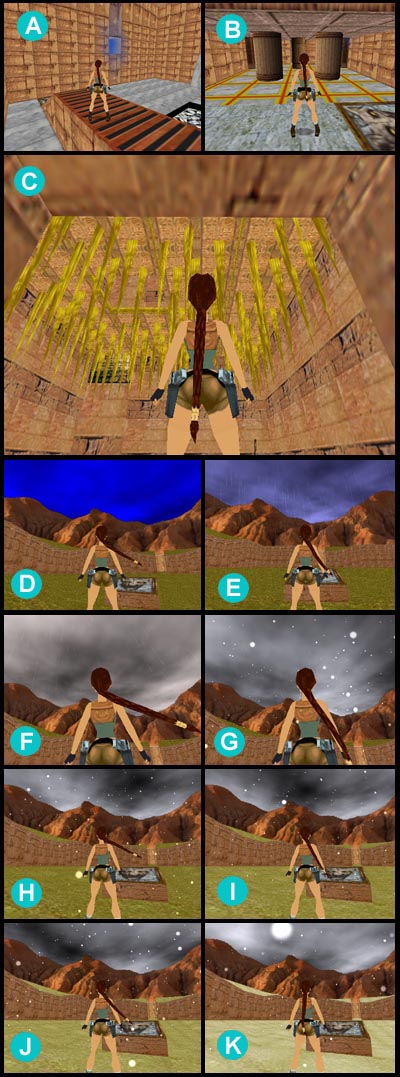
Miscellanous
Download: Mis_Sample_1.zip (2.9 MB)
This is a playable demo, you have to pass some traps and difficulties.
In this demo there are demostration about usage of following topics:
A) How to use UV scrolling texture and new pyshics triggers, to simulate a tapis roulant. In picture A, lara was moved by tapis roulant.
How create a saving method like in tomb raidr 3, where to save the game it was necessary find a blu crystal to use when you want save the game.
If you look carefully, in picture A you can see an hole in the wall with blue lights, well in that hole there is a blue crystal, the only way to save the game in this demo.
Study the script.txt to discover how this method has been realized. You have to remove the common Save Memory Card object from inventory (this disable also the F5 key to save the game) and then create a global trigger to perform a saving only when lara select from inventory a given item: the blue crystal.
B) How to use fragmented triggers to create sensory grid. In picture B you can see the final result. Lara has to avoid the yellow/red pulsing linee because otherwise she will be fired.
You can modify this example also to enable other triggers instead to burn lara, for example to engage an alarm system, and replace the simple drawn of strips with 3d statics like red laser rays.
C) How to use triggers to move items (moveables) and command script ItemGroup, to create a spiked moving ceiling.
In picture C the ceiling move endless up and down.
D) How modify in run-time the weather.
In pictures D and following, upto K picture, you can see the changed performed in game using an Organizer script command to syncronize the times to engage different triggers to modify the weather.
The sky starts from almost clear (D picture) then it becomes cloudy, it starts a light rain (non very visible in E and F pictures) and tunders and lights, at end starts to snow.
Another interesting demostration in this sample, is about how create the effect of snow that, progressivly, get white the meadow that, at start was dark gree (picture D), until to reach a white meadow (picture K)
This "whiting" effect has been get using P-Frames animated textures, where the single texture applied on floor were changed after some time interval, with other whiter textures.
Miscellanous II
Download: Miscellanous II (4 MB)
You have to rebuild .tr4 and .dat files before playing this demo.
In this demo you find a demonstration of the new bridge collisions with an html tutorial showing features, tips and tricks to get best results with this new kind of collisions.
Thanks to the bridge objects mixed with conditional fragmented triggers you can create hanged footbridges with new shapes.
In picture A you can see a ring where lara is able to walk or to fall down in the middle hole.
Increasing the depth (height) of the bridge collision (and you may do this using the new OCBs for bridges) you can use a invisible bridge to simulate a precise collision of some item, like the column of picture B.
That column has a round collision where lara is able to walk over or around.
Another skill of the bridge is that you can create slope with tilt grather than 2 where lara is able to walk without sliding. (Picture C)
In fact, now, there are new bride objects: the BRIDGE_TILT3, BRIDGE_TILT4 and the BRIDGE_CUSTOM where you can set the tilt grade using some OCB values.
Other the bridge collisions, in this demo you find also some example about the new scaling (resizing) feature. Now you can change the size of static items, using ocb values or in dynamic way with some new flipeffect triggers. In the picture D the lion changes its size in dynamic way. You can reduce or magnify any static of different times to different speed.
Another new feature showed in the Miscellanous II, it's that about the sprites.
Now you can show 2d sprite over the screen like they were little images. (Picture E)
It has been added a new sprite object named CUSTOM_SPRITES where you can store many images to show on the screen in single way or combing them like a grid to get wider images.
The sprites, respect to the show image flipeffects, have the advantage that you can show more than one image at once, and you can use also semitrasparent sprites and you can colorize them, too.
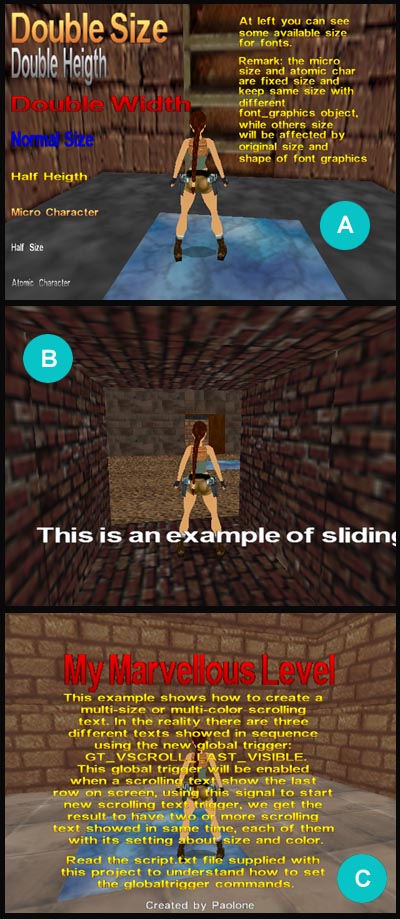
New Font
Download: NewFont.zip (2.5 Mb)
This demo has been changed respect than 2008 version, now it has been added also a sliding text example, and the movemnt of vertical scrolling text has been enhanced.
This sample is important for the enclosed wad file where you can find the new FONT_GRAPHICS object.
You can change the font using the NG Font Editor tool you find in Tools panel of NG_Center, anyway you have to copy the original FONT_GRAPHICS object in your wad before modifying it with Font Editor.
In this short sample you can see the new different formatting available for characters (Picture A)
You can change the size about width or height, or to use some fixed size fonts.
This demo shows also two interesting flipeffect triggers to show scrolling text in vertical (Picture C) or horizontal, like a single fast-info strip (Picture B)
In above example (A and B) the text is moving, upward for Picture C and from right to left in Picture B.
Remarks:
1) There is a boring bug when you use new ng font in a wad file where there is also a waterfall object. The animated texture of waterfall could be compromised and it could appear like a texture with literals (A C F ecc).
I tried to fix this bug but it happens in wad merger, when it creates the new .swd file with textures.
2) When you build the script.dat remember to copy in SCRIPT folder also the files: "Text_DisableInput.txt", "Text_FontDescription.txt" and "Tex_MultiSize.txt", because they are used as external string and they will be put in english.dat when you build the script.
New Mirrors
Download: New Mirrors (3.19 MB)
From version 1.2.2.3 the features of the mirrors have been enhanced.
Now there are new mirrors (A Picture) other than west, floor and ceiling. You can place a mirror in any wall of the room.
Now you can place one, two or more mirrors in same room. Analyse this demo to discover how place two mirrors in same room avoiding the multireflex problem (B Picture)
In spite it's not in topic, in this demo there is also an example about the usage of the new OCBs for Switch1/2/3 items. The sample shows how using a Switch item to perform on and back some special triggers, like move a static item go and back using same swich with trigger and antrigger activation.
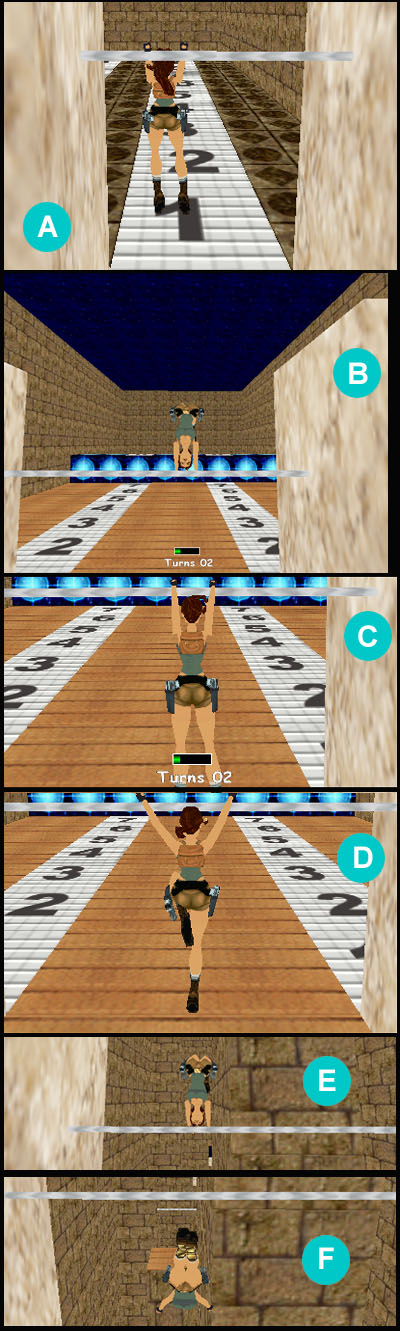
Parallel-Bars
Download: Parallel_Bars.zip (2.2 Mb)
The parallel-bar is an object we saw in Tomb Raider Chronicles.
In this sample there are two levels, one with same parallel bar of TRC with no changes, while in the second there is a customized parallel-bar with some news.
A) In picture A you can see the default parallel-bar.
The lengtht of jump affected by value set in OCB field of Parallel-bar in ngle program
In default parallel-bar there is a unique "good" direction, where the ocb value will give a long jump, while in the opposite direction lara will perform always a very leak jump, indifferently by ocb value.
Remark: if you wish, you can remove this default working mode, forcing the parallel bar to work in same mode for both side. You can realize this using the command:
Customize= CUST_PARALLEL_BARS, PB_DOUBLE_FACE, IGNORE, IGNORE,IGNORE
The flag PB_DOUBLE_FACE permits to do work the parallelbar in same way for both side.
B) The customized bar can support different features in according with values set in Customize= CUST_PARALLEL_BARS script command.
In this demo I engaged all customized features for parallel bar of second level, but you can choose only some single features, of course.
In picture B you can see result using the:
PB_SHOW_CHARGE_BAR flag
and
PB_SHOW_CHARGE_COUNTER flag
The PB_SHOW_CHARGE_BAR flag shows that little progress bar with current jump power (the green bar), while the PB_SHOW_CHARGE_COUNTER flag shows the same jump power in the form of number of turns.
Remark: if you want have progressive jump power, you'll have also to type in customize command the PB_PROGRESSIVE_CHARGE flag, to enable the method of charging power, turn after turn.
C) Another used customizing is that enabled with PB_MULTIPLE_ENDINGS flag.
The technical realization is not perfect, anyway the idea is to give to player the chance to exit from turning in different position, with different results.
When the player let the ACTION key while lara is position showed in Picture C, lara will fall down like you see in Picture D
E) While if player let ACTION key in the position showed from Picture E, lara will fall down how showed in picture F.
In this situation she will often die.
The multiple ending is a way to add new interactivity but the animations used are not perfectly linked with previous turning animations since I used some old standard animations.
If you want rebuild these multiple endings with your custom animations, you can do, just you omit the PB_MULTIPLE_ENDINGS to avoid conflicts, and then follow the instructions you find in description of CUST_PARALLEL_BARS constant in Reference panel of NG_Center
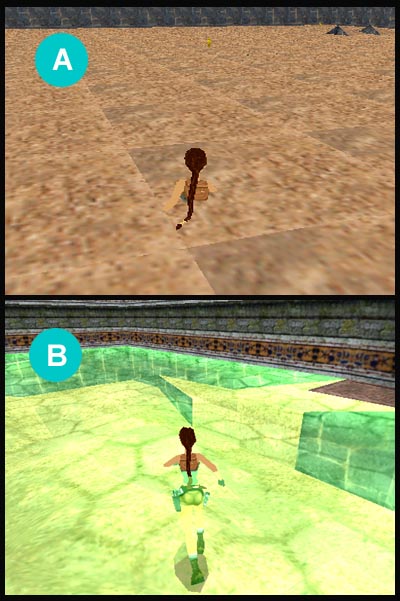
Quick-Sands
Download: QuickSand.zip (2.5 Mb)
In this sample you have two different quick sand pools: floating/semitransparent (Picture B) and still/opaque (Picture A).
About settings, the quicksand doesn't require any script settings but you can set the waving of surface in NGLE.
You can set the quick-sand type using the white numeric box immediatly at right of special button [water/rain/snow/q-sand] below 2d panel.
The first three values "1", "2" and "3" work like for water, with waves always bigger increasing the number, while the setting "4" for quicksand force a full still surface (no waves, like in Picture A), this could be useful to hidden the view of quicksand to player, getting a most difficultous game.
In this project there is also an example to use globaltrigger script command to force a trigger (in this case I used a finish trigger) when Lara picked up a given number of items (6 canopic jars).
Remark: this sample requires a tombnextgeneration.dll with version 1.1.8.4 or higher. (20 august 2008)
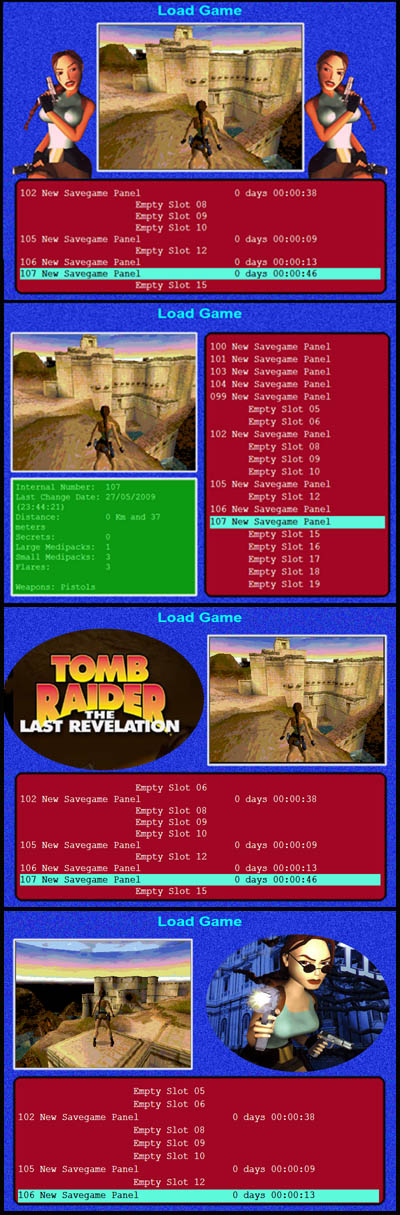
Savegame Panel
Download: Savegame_Panel.zip (8.8 Mb)
From 1.2.0.8 version, trng is able to support a new Savegame Panel to load or save the game.
You have to use the script command SavegamePanel to choose background image and layout to use.
With the new savegame panel you have different advantages:
1) You can have an image for each savegame selected, in this way for the player will be more easy look for a specific savegame.
2) You can have more than 15 savegame slot, but you can choose freely the number of savegames managable in same moment. (Max 100 savegame slots)
3) For each selected savegame the player may see informations about some internal values of that savegame: number of medipack, available weapons, secrets, distance ect.
4) You can create your custom backbground image and choose between 7 different layouts, where for "layout" we mean the disposition of different zones: savegame list, savegame image and (optional) savegame info.
In left picture you can see some of above layouts.
If you choose a layout where the info savegame frame is missing, you can use that empty zone to draw a logo of your adventure or some other amazing look.
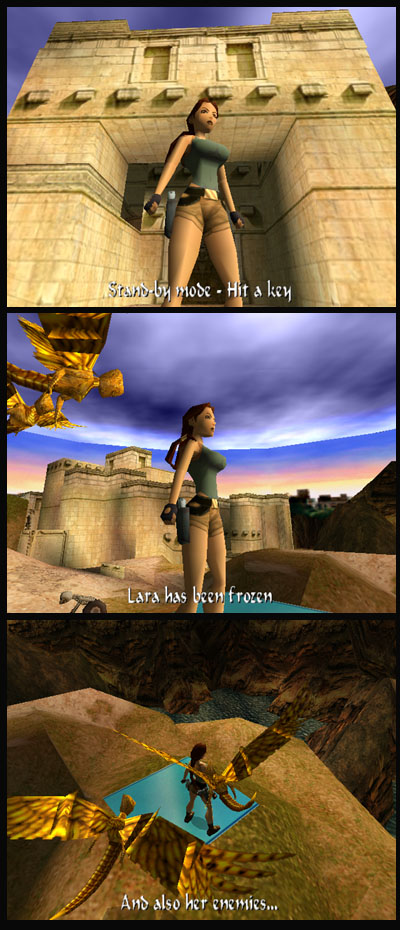
Stand-by Mode
Download: Standby.zip (3 MB)
This demo show some usage of StandBy script command.
The standby used in native mode, is a sort of auto-demo that starts in game when the player don't give game commands for some time.
The main target of standby, in native mode, is to show the face of Lara. Sinche in game lara is looked always from back it is a nice news seeing finally also the beauty face of Lara.
The native standby require a StandBY command with ID = 1.
If you place other StandBy commands in same [Level] section, you'll have to type different IDs, of course. These additional standby will be never played byself, but you can enable them using the flipeffect: "Camera. Enable the <&>StandBy camera effect for (E)seconds"
The reason to use a standby via flipeffect, could be to have a sort of easy flyby camera. For example if you use the TSB_PANORAMA type, and you set a large Distance field, you can show a large side of first side of your level avoiding to create a complicated flyby sequence.
The Standby commands you see in the script.txt supplied in this demo, are only examples and you can change them as you wish. For example you could use a matrix or panoram effect for the native standby (id=1). Anyway in this case remember to use the FSB_DISABLE_ON_CRAMPED_SPACE flag, because, otherwise, the standby could begin when lara is covered by many walls and the result in game could be very poor.
If you don't wish disable the standby in cramped spaces a solution could be to use a standby that doesn't require large space around to lara, to work correcly. For example a portrait type, with a short Distance (less than 1024) and the FSB_IMMEDIATE flag to avoid the first phase when the camera from back moves and turns to reach the position in front of Lara.
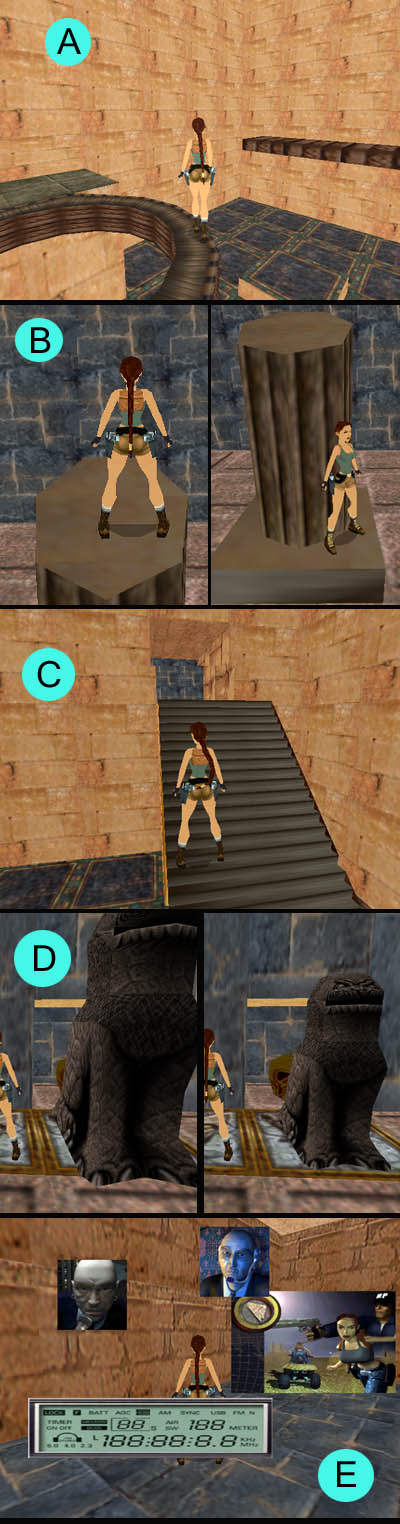
Statics Demo
Download: Statics.zip (2.4 Mb)
This project requires TRNG version 1.1.8.7 or higher.
In this ample there are examples about following topics:
A) Huge Collision. To handle static bigger than 6x6 sectors (Picture A)
In old tomb4, a statics can't have a size bigger than 6x6 sectors. If you tried to create statics bigger than 6x6 the collision didn't work fine, and lara was able to "enter" in some side of these huge statics.
B) Ocb to set a transparency level for each static. You can choose between Ice transparency or Glass transparency (see picture B)
C) Flipeffect trigger to add pulse color effect to statics. See picture C, the static column changes endless its color tone.
D) Explosions of static. Setting correct ocb you can transform each static in a bomb that will explode when lara touches it.
In picture D you can see what happen if lara touches a static (a vase)
E) Moving statics. Now you can move statics within same room.
In picture E you can see a little red missile (it is moving very fastly) hit lara killing her whereby an explosion (picture F).
In this demo there is also an example of Hard Shatter, i.e. a static with a correct ocb could become very hard to be destroyed.
The hard shatters can be destroyed only using explosive weapons, but the common weapons (pistols, revolver, common crossbow ammos) cann't shatter it.
Remark: Also vheicles, rollingballs and sphinx are able to destroy an hard shatter.
In this demo there are examples also about other ocb to set in statics to get them able to poison, burn or damage lara at touching.
This is an abstract of description of Static OCB you can find in Reference panel of NG_Center:
From TRNG version 1.1.8.7 you can set in each static object some OCB codes to set following features:
4 = Disable collision. Lara could pass across the static
8 = Set Glass Transparence. The static will have a glass transparency effect
16 = Set Ice Transparence. The static will have a light transparence, like the ice
32 = Damage Lara on physical contact. The static injures lara if she touches it. The damage removes 10 hp to lara (full vitality= 1000) anyway you can change this value using CUST_SET_STATIC_DAMAGE in Customize script command.
64 = Burns Lara on physical contact. Lara will be burned anyway she will have yet some time to search water to save her.
128 = Explode killing Lara on physical contact. With this ocb you can transform this static in a sort of mine.
256 = Poison lara on physical contact. Lara will be poisoned when she touches the static. You can change the poison intensity using CUST_SET_STATIC_DAMAGE in Customize script command.
512 = Huge Collision. Inform the trng engine that current static has a collision box larger than 6 x 6 sector.
1024 = Hard Shatter. In old tomb4 the shatter objects went destroyed by every weapon other by Skeleton and Templar. If you add 1024 to ocb of some shatter object you can increase its hardness and the static will be destroyed only by explosive ammo (not flash grenade)
, sphinks, jeep, sidecar and Rollingball (if it has correct OCB).
2048 = Heavy Trigger on contact. When Lara touches a static with OCB 2048 the heavy trigger placed under the static will be activated.
Remarks:
*You can add above values but you cann't add the two different type of transparence.
For example if you want the static was like glass and with no collision you can type in OCB window the value (8 + 4 =) 12
Other example:
To transform a static in a bomb was able to explode lara and burn her: 64+128 = 192
*You can change in game time these attributes using the "Static. ..." flipeffects.
TRNG Variables
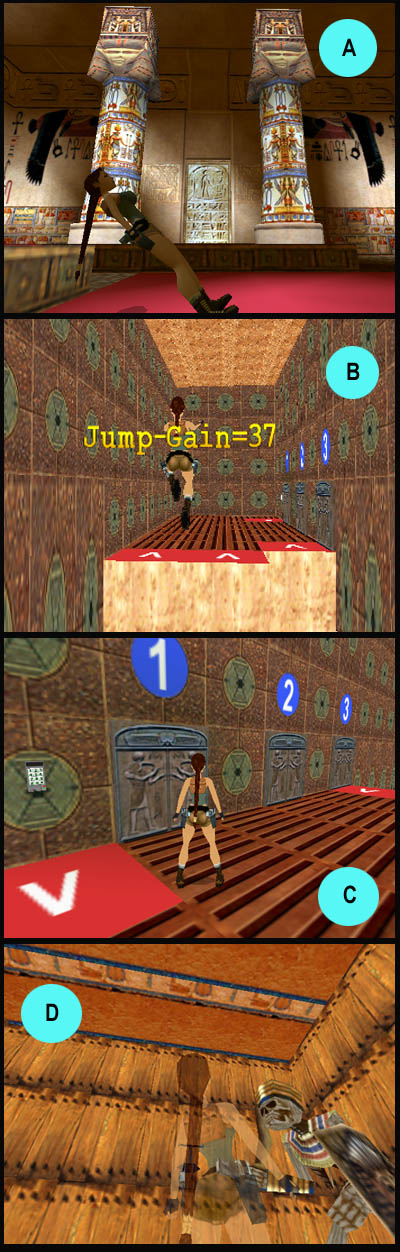
Download: TRNG_Variables.zip (3.2 Mb) (Updated the tutorial with the description of the Inventory Critical Memory Zone)
In this demo you can find also a tutorial about the new TRNG Variables and the Critical Memory Zones to create new skills.
In the project you can find some demostration about usage of variables and critical memory.
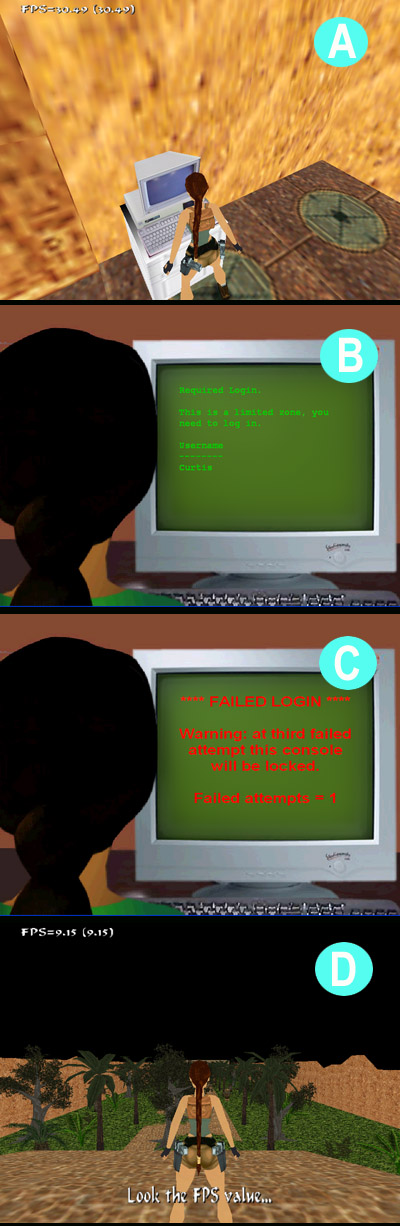
In the picture A you can see an effect created modifying the vertical orienting (facing) of Lara.
The most interesting skill in this demo is the super jump, get adding a jump-gain when lara perform a rush before jumping (Picture B)
In the project have been described also other new features like the new Switch script command to select different triggergroup in according with the value of some variable.
In the picture C you can see a keypad used to choose the door to open, closing the others in same time.
Another new feature is the item freezing (Picture D).
You can freeze an enemy and he becomes like a statue, then you can wake up him with another trigger adding also some special effects like "vibration" or "explosion" for the waking-up action.
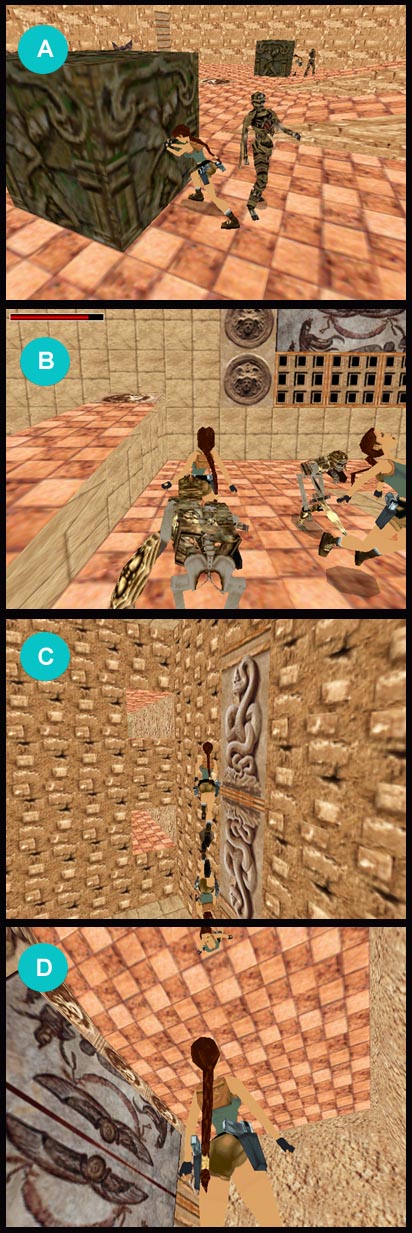
Vertical Triggers
Download: Vertical_Triggers.zip (11 Kb)
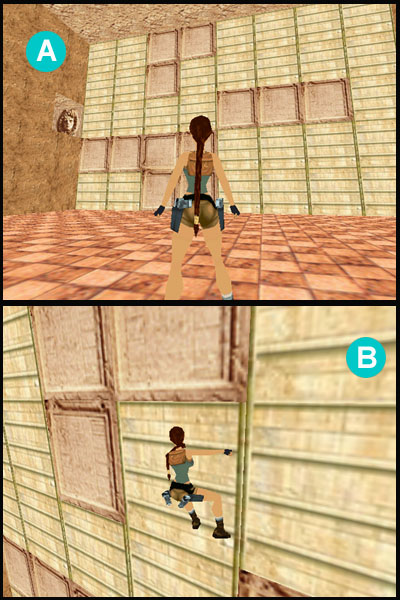
This sample shows a possible usage of vertical triggers.
A) The vertical triggers have been set to create a non linear climbale wall. In picture A you can see the final result: lara will be able climb only where you see scales textures
B) If she tries to climb over squared frames she will fall down.
The trick to realize this target is to disable the ACTION key (necessary to keep lara in climb status) when the height of lara from floor enters in some setting of vertical trigger placed in the sectors closed to climb wall.
Remark: you have to build this project using standard files of Catacombs (wad and tga).