How to customize Visual Express editor
Microsoft Visual Express allows to you to customize its interface with plenty of variations.
You can add new windows, change size and position of current windows, move panels from a window container and another.
Some infos about customization of panels have already described in Debugger Tutorial help page.
Customization of icon buttons
In current document we'll explain how to add new icons to support some interesting editing features.
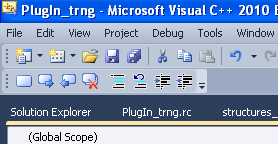
To add new icon button on top bars of Visual Express you have to click on this very little button:
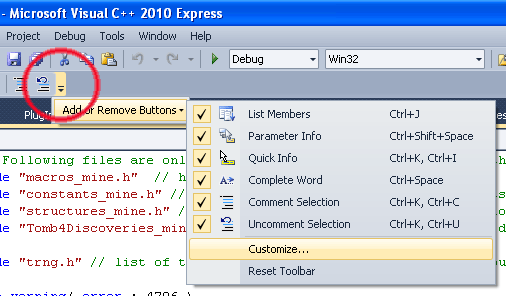
Look the red circle.
Clicking on that button it will be displayed the menu item "Add or remove buttons", moving the mouse pointer over this menu item, it will be displayed a larger window of selection.
Now click on "Customize" menu item.
It will be showed another window:
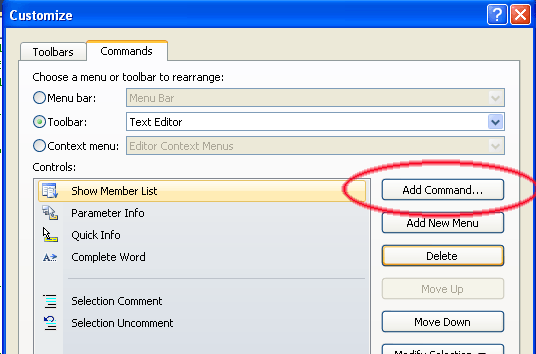
In this window you see the current icon buttons already enabled in top bar.
I suggest to remove the items:
Show Member List
Parameter Info
Quick Info
Complete Word
Because we'll not use so often above commands.
To remove them, just you click on first and then click on [Delete] button, then you repeat the operation for others.
Don't remove: "Selection Comment" and "Selection Uncomment" because these are very useful.
Now click on [Add Command] button and it will be displayed another window:
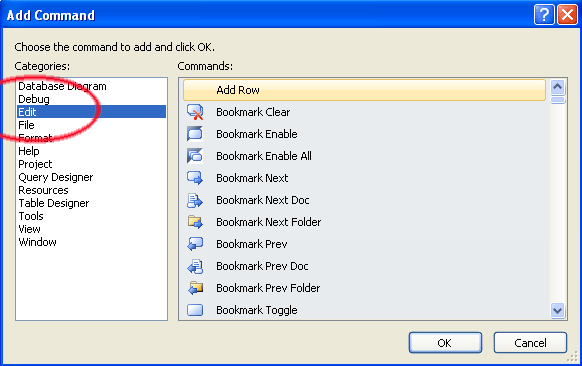
In this window, click on the "Edit" item that you find in left panel.
Now in the "Commands" right panel, you have to look for item with name: "Bookmark Toggle"
Once you found it, click on it to select it, and then click on [Ok] button.
Then you have to repeat same above operations for following names:
Bookmark Next
Bookmark Prev
Bookmark Clear
Line Indent
Line Unindent
At end you'll have all these names in main customization window.
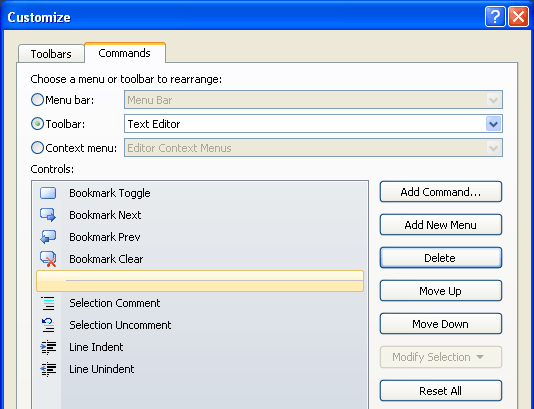
It's advisable that you move up/down the items in the list, to get same sorting you see in above picture.
To move an item, just selecting an item, and then click buttons: [Move Down] or [Move Up] to reach wished position.
When you completed the sorting of items, you can click on [Close] button.
Now in top line of Visual Epress you should see the icons we added:
How to use the new icon buttons
 This button is to add (or remove if on that row it was already present) a bookmark.
Bookmarks are very comfortable, because it will happen very often that we are working on same function but then you'll have to move in another position of the source to remember some name of variable or function and then... you'll have to come back to your function.
In spite it's not a so huge job finding newly the right point, with bookmarks you can get faster this very common operations.
You can set with this button, a bookmark on code where you are working and in other zones of source, and then you'll be moved immediatly on these points when you click one of markbook navigation buttons.
 These are the navigation bookmark buttons.
You can click one or other to move on circular sequence of bookmarks you set

If you have set too much bookmarks and you wish clear all them in same moment, you can click on this button.
 With this button you can transform in comments all selected code.
Sometimes, you need to exclude some zones of the code but without loosing forever it.
It could happens because we had some code to show log messages and you wish remove it but with the doubt that in future it could be newly useful.
Another situation is when you tried to create a feature using a code but then we wish try with another method. In this case you can transform in comment previous version, try the new, and if the older was better you can recover it..
 This button remove the comments from selected text. You should use this command only on zones where you previously had transformed in comments a code zone.
About the usage of "comment" buttons, see previous chapter about the button to transform in comment a source zone.
 You can move at right of a tabulation space all current selected text.
Since in C language it's important using indentions to get more readable the different logical blocks, like that inside of brackets parenthesis, sometimes it's useful to be able to move large zone of code with this button.
Commonly, you'll type code, row by row, setting right indention with TAB key, but sometimes you need to change the indention after a change, for instance placing a whole code zone in a new if { } statement, or because we copied an old code to use newly with litte changes in another function. In this case, the copied code could have an indention different than that where you mean use it.
 This button move all selected text of a tabulation column lefter.
You can use this command with the previous to change the level of indention as you wish.