;------------------  Section for flipeffect trigger: description of the trigger -------------------------------

<START_TRIGGERWHAT_9_O_H>


<END>


;type here the sections for arguments used by above flipeffects


;------------------- Section for Action triggers: description of the trigger -------------------------------------

<START_TRIGGERWHAT_11_T_H>


<END>


;type here the sections for argument of above action triggers


;------------------- Section for Condition triggers: descrption of the trigger -------------------------------------

<START_TRIGGERTYPE_12_T_H>


<END>


;type here the sections for arguments of above conditional triggers

<START_TRIGGERWHAT_9_O_H>

200: Remove distance fog immediatly

<END>
<START_TRIGGERWHAT_11_T_H>

240: Add flames to <&>enemy

<END>
<START_TRIGGERTYPE_12_T_H>

180: The <#> Enemy is aiming Lara

<END>
64:Text. Print ExtraNG <&>string on screen for (E) seconds
<START_TRIGGERWHAT_9_O_H>

500: Move Lara's hair in <&>way

<END>
<START_FLIPEFFECT_500_T_H>

0: Remove changes on Lara's hairs

1: Move hairs to west

2: Move hairs to east

3: Move hairs upside

<END>
<START_TRIGGERTYPE_12_O_H>

113:The <#>Creature is touching (E)water

<END>
<START_CONDITION_113_O_H>

#MOVEABLES#

<END>


<START_CONDITION_113_B_H>

0:Low water, one click or less

1:Middle water, more than one click and less than 3 clicks

2:High water, greater or even than 3 clicks

<END>
Sections to use for Arguments |
|||
| Argument Type | FLIPEFFECT | ACTION | CONDITION |
| (Object to trigger <#>) | ... |
START_ACTION_nn_O_H Example: <START_ACTION_43_O_H> |
START_CONDITION_nn_O Example: <START_CONDITION_14_O> |
| Timer (Parameter <&>) |
START_EFFECT_nn_T_H Example: <START_EFFECT_47_T_H> |
... | ... |
| (E)xtra |
START_EFFECT_nn_E_H Example: <START_EFFECT_48_E_H> |
START_ACTION_nn_E_H Example: <START_ACTION_43_E_H> |
START_CONDITION_nn_B_H Example: <START_CONDITION_14_B_H> |
<START_CONDITION_113_O_H>

#MOVEABLES#

<END>
Preset List for ArgumentsIn (E)xtra parameter for Action and Flipeffect triggers you can host only values between 0 - 127 In (E)xtra parameter for Condition trigger you can host only values between 0 / 31 In Timer parameter of flipeffect triggers you can host values between 0 / 255, or, if you do not use (E)xtra parameter in that flipeffect, until 0 / 32767 "Object to trigger <#>" field can host any index of ngle objects but this value will be then reduced to 0/1023 when the ngle index will be converted in tomb format. For this reason you cann't host your constants with values higher than 1023 in Object field. The list of ngle items (moveables, camera ect) may be hosted ONLY in Object field. Note: when you see in the Range column, as max range value, the "*" sign, it means "the max index for that kind of ngle index". |
||
| Preset Code | Range | Description |
| #ADD_EFFECT_255# | 0 / 255 | List of ID for AddEffect= script command from 1 to 255 |
| #ANIMATION_LIST_255# | 0 / 255 | List of animation indices from 0 to 255, for timer parameter of flipeffect trigger |
| #ANIMATION_LIST_32A# | 0 / 31 |
List of animation indices from 0 to 31. It will be fit also in (E)xtra parameter of condition |
| #ANIMATION_LIST_32B# | 0 / 31 |
List of animation indices from 32 to 63. You'll have to add +32 to value of parameter to get real index of second group. |
| #ANIMATION_LIST_32C# | 0 / 31 |
List of animation indices from 64 to 95. You'll have to add +64 to value of parameter to get real index of third group. |
| #ANIMATION_LIST_B# | 0 / 255 |
List of animations for Lara, from 256 to 511 Note: you have to add to parameter the value +256 to get the real index of second group |
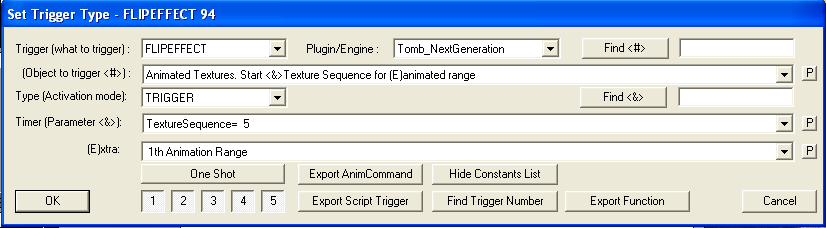
| #ANIMATION_RANGE# | 0 / 39 | List of animation ranges for animated textures |
| #BACKUP_LIST# | 0 / 127 | List of game backup from 1 to 127 |
| #BIT_LIST# | 0 / 31 |
List of bit values as flag mask. Pratically in the list there will be texts like thee: $00000001 $00000002 $00000004 To decode the value of this parameter and get newly the above bit flag, you'll use this code: BitFlag = 1 << Value; Where the "<<" operator move at left for Value times the value "1". |
| #BUTTONS_LIST# | 0 / 63 |
List of different combination of trigger button enabled. Each row will have a syntax like this: "[1][2][3][4][5] [OneShot]" But many of above button will be missing. The value of this parameter is the bit mask of buttons, and you should verify the presence of some enabled button in this way: if (Value & 0x001) { // enabled button [1] } if (Value & 0x0002) { // enabled button [2] } if (Value & 0x0004) { // enabled button [3] } The one shot is: if (Value & 0x0020) { // enabled one-shot button } |
| #CAMERA_EFFECTS# | 0 / * | List of all indices about CAMERA and FIXED CAMERA in the level |
| #CD_TRACK_LIST# | 0 / 255 | List of audio track CD of AUDIO folder |
| #CLICK_DISTANCE_32# | 0 / 31 | List of click number for distance. One click is 256 game units. |
| #COLLISION_CEILING# | 0 / 127 |
List of clicks to move up/down collision From 1 to 63 to decrease ceiling collision from 64 to 127 to increase ceiling collision. For values higher than 63 you'll have to subtract to parameter value 64 if (Value < 64) { // reduce the collisione MoveDownCollision= Value; }else { // increase the collsion MoveUpCollision= Value-64; } |
| #COLLISION_FLOOR# | 0 / 127 |
List of clicks to move up/down collision From 1 to 63 to decrease collision from 64 to 127 to increase collision. For values higher than 63 you'll have to subtract to parameter value 64 if (Value < 64) { // reduce the collisione MoveDownCollision= Value; }else { // increase the collsion MoveUpCollision= Value-64; } |
| #COLORS# | 0 / 100 | List of 28 colors. The max value of 100 will be used to reset fog bulbs. You cann't use this list in Button (E)xtra parameter |
| #DEGREES# | 0 / 7 | List of degrees from 0 to 360 with steps by 45 degrees |
| #FLY_BY_SEQ# | 0 / * | List of indices about sequence of flyby camera |
| #FLYBY_LIST# | 0 / * | List of all Flby camera of the level |
| #FMV_LIST# | 0 / 127 | List of IDs for FMV. |
| #FOG_DISTANCES# | 0 / 240 |
List of values about distance in sectors, positive and negative values, in the range (-119 / +119) To convert the Value of this parameter you'll use this code: Distance= 120 - Value; |
|
#FRAG_2x2# #FRAG_3x3# #FRAG_4x4# |
0 / 15 |
The list will be a serie of value where each value identify a coordinate (x,y) on a ideal grid that divides a sector. The formula to compute each value is: Value = y + (x *4) While to extract from a single value the pair of x,y coordinates, the code will be: x = Value / 4; y = Value % 4; |
| #HALF_CLICKS# | 0 / 512 | List of values where each value is an half of click, i.e. 128 game units. |
| #HALF_CLICKS_32# | 0 / 31 | List of half-clicks for distance. This list is enough little to be stored in Button (E)xtra parameter for conditions |
| #INVENTORY-ITEM-INDEX# | 0 / 118 |
List of moveable that you may find in inventory: like puzzle items, flare, medipacks ect. The value get from trigger will be an index between 0/117, to convert it to read moveable slot you have to use above index to access to Trng.pGlobTomb4->VetInventory[] array. For instance, if Timer variable has the value from trigger, you can discover the slot using the code: short MovSlot; MovSlot= Trng.pGlobTomb4->VetInventory[Timer]; And now in MovSlot there will a common slot id of some inventory moveable. |
| #INVENTORY-ITEMS# | 0 / ~500 | List of SLOT names but only for items can be showed in Inventory |
| #KEYBOARD_MODE# | 0 / 3 |
List of four conditions. It is a combination between states "Multi-shot/Single-shot" and "Active/Inactive" The value of parameter should be checked in this way: If (Value & 1) { // ACTIVE }else { // INACTIVE } if (Value & 2) { // MULTI-SHOT }else { // SINGLE-SHOT } |
| #LARA_ANIM_SLOT# | 0 / 127 | List of SLOT about lara: skin, weapons, crowbar ect. |
| #LARA_OTHER_SLOTS# | 1 / 31 |
List of Lara's slots, omitting the base lara with slot = 1. This preset list used to perform a swap mesh with other lara's slots. |
| #LARA_POS_OCB# | 0 / * | List of all indices of LARA_START_POS items placed in the level, showed by OCB values |
| #MEM_INVENTORY_INDICES# | 0 / 118 |
List of indices to access to an array of structures, where, for each index, there is some data for that inventory item. You can access to this structure using this code: Trng.pGlobTomb4->pAdr->pVetStructInventoryItems[Index]. Note: Since it is a list of structure, then you can type '.' (dot) to see the list of fields for that given structure. The same indices get access to another array, about some flags related to given inventory item. To access to these flag array you use this code: Trng.pGlobTomb4->pAdr->pVetFlagsInventoryItems[Index] Note, above is a BYTE array, so all flags for a given item will be stored in a byte (0/255) To have better infos about these two arrays, use TrngPatcher: 1) Load the data tomb4 source with the command [Load->Tomb4 Data Source] 2) Then, in loaded source, look for "4AC068:" text, to find the structure array, while look for "4AC9B8:" text, to find the byte flag array. |
| #MEMORY_ANIMATION# | 0 / 31 |
List of animation memory variables. To access to structure of that variable you'll use the value of parameter like an index: StrAdrMemory *pAdr; pAdr = &Trng.pGlobTomb4->pVetMemoryAnimation[Value]; |
| #MEMORY_CODE# | 0 / 127 |
List of code memory variables. To access to structure of that variable you'll use the value of parameter like an index: StrAdrMemory *pCode; pCode = &Trng.pGlobTomb4->pVetCodeMemory[Value]; |
| #MEMORY_INVENTORY# | 0 / 31 |
List of indices for Inventory memory variables. You use the value of parameter as index of global vector: StrAdrMemory *pAdr; pAdr = &Trng.pGlobTomb4->pVetMemoryInventory[Value]; |
| #MEMORY_ITEM# | 0 / 127 |
List of memory item variables. To convert the value of parameter to pointer to structure of that variabile you use this code: StrAdrMemory *pMemory; pMemory = &Trng.pGlobTomb4->pVetItemMemory[Value]; |
| #MEMORY_SAVE# | 0 / 127 |
List of Memory savegame fields. The value is an index to record for each Memory Savegame variable. You should access to this record in this way: StrAdrMemory *pSave; pSave= &Trng.pGlobTomb4->pVetMemorySavegame[Value]; // and now with pointer pSave-> you can access to all values about that memory address |
| #MEMORY_SLOT# | 0 / 31 |
List of slot memory variables. To access to structure of that variable you'll use the value of parameter like an index: StrAdrMemory *pAdr; pAdr = &Trng.pGlobTomb4->pVetSlotMemory[Value]; |
| #MICRO_CLICKS# | 0 / 127 |
List of micro clicks for distance. This list gives the chances to set values in game units for distance, but only choosing between step by 8 game units. To convert the value of this parameter in game units you use this computation: GameUnits = (Value+1) * 8; |
| #MOVEABLES# | 0 / * | List of all moveable items already placed in current level |
| #NEGATIVE_NUMBERS# | 0 / 127 |
List of negative numbers, from -1 to -128 To value of parameter will be positive, to convert it newly at its negative value you'll use this code: NegativeNumber = Value - 128; |
| #NG_STRING_LIST_255# | 0 / 255 | List of first 256 indices of Extra NG strings |
| #NG_STRING_LIST_ALL# | 0 / 9999 |
List of first 10000 NG extra string indices. You can show this preset list only in full timer of flipeffect trigger, i.e. a flipeffect where you do not use (E)xtra parameteres and for this reason you can have as single argument a timer with values upto 32767 |
| #PC_STRING_LIST# | 0 / 255 | List of PC strings |
| #PERCENTAGE# | 0 / 30 |
List of percentage values. First group of values (1 / 9) will be seen as 0.N % For instance value "4" it will mean "0.4 %" Second group of values (10 /18), it will be seen as percentage from 1% to 9% Third group of values (19 / 28), it will be sees as percentage from 10% to 90% with step by 10% (10, 20, 30, 40, 50, 60, 70, 80, 90) |
| #PSX_STRING_LIST# | 0 / 255 | List of PSX strings |
| #RECHARGE_256# | 0 / 210 |
List of values for increasing HP. First group of values, between 1 / 200, it is an absolute value to increase health Second group of values, between 201 / 210 it is a percentage with step by 10: 10,20,30,40,50,60,70,80,90 |
| #ROOMS_255# | 0 / 255 |
List of room indeces from 0 to 255 Note: the value of parameter is already the real tomb index, it doesn't require conversion from ngle to tomb index. |
| #SAME_OF#= | Variable |
This directive works in different ways than others. While other preset list force in specific way a given preset list, the #SAME_OF#= directive works like a link to duplicate (copy) some other parameter list, in current new parameter list. For instance if we created this parameter list for flipeffect trigger 51 in its Timer field: <START_EFFECT_51_T_H> 0: All keyboard commands 1: Up 2: Down 3: Left 4: Right 5: Duck 6: Dash 7: Walk 8: Jump 9: Action (and Enter) 10: Draw Weapon 11: Use Flare 12: Look 13: Roll 14: Inventory 15: Step Left 16: Step Right 17: Pause 18: Save the game (special) 19: Load the game (special) 20: Select weapon keys (all fast weapon selctors) <END> And then, in another trigger we need to supply same parameter list, but, for instance, for the flipeffect 400, we'll type a text like this: <START_EFFECT_400_T_H> #SAME_OF#=EFFECT_51_T <END> In above way, the parser we'll replace, inside of parameter data for flipeffect 400 the same parameter list we saw for parameter of flipeffect 51 This directive works only for previously typed parameter list, of course. |
| #SEQUENCE_128# | 0 / 127 | A list of growing values. It is enough short to be hosted in (E)xtra timer for flipeffect and actions but not for condition triggers. |
| #SEQUENCE_32# | 0 / 31 | List of growing values from 0 to 31. This list is enough limited to be hosted in Button field (E)xtra parameter |
| #SET_STANDARD_MESH# | 0 / 98 |
List of indices to access to slot array. To access to selected slot you use this code: Trng.pGlobTomb4->pVetStandardSwapMesh[Index]; Note: in above list of slot there is no specific reason. Simply I chose a set of slot where I thought it was reasonable store a swap mesh outfit. |
| #SFX_1024# | 0 / 1023 | Indices for first 1024 sound sample effectc |
| #SINK_LIST#" | 0 / * | List of all indices of Sink effect in the level |
| #SLOT_MESH_MOVEABLES# | 0 / 127 |
List of slot to use for mesh swapping. The value of parameter will be an index to a vector with slot indices. You get the slot value in this way. SlotValue = Trng.pGlobTomb4->pVetSlotMeshMoveables[Value] |
| #SOUND_EFFECT_A# | 0 / 255 | List of sound sample effect of first group, from 0 to 255 |
| #SOUND_EFFECT_B# | 0 / 255 |
List of sound sample effect of second group: from 256 to 511. Please, note that the value of argument it will be in the range 0 / 255 therefor to get the real index you'll have to add 256 to the argument value. |
| #STATE_ID_LIST# | 0 / 127 | List for state-id of lara. |
| #STATIC_LIST# | 0 / * |
List of all indices of static items in the level Note in the code you'll have to convert this static index from ngle format to double tomb indices |
| #STATIC_SLOTS# | 0 / 159 |
List of "only-static" SLOT Note that the value of this parameter will have 0 as first static slot item. |
| #STRING_LIST_255# | 0 / 255 | List of first 256 tomb string indices. To use for Timer parameter of flipeffect but it is not possible use it for (E)xtra parameter of Action or Condition |
| #SWAP_MESH_SLOT# | 0 / 85 |
List of indices to access to a slot array to use for swapping mesh. You access to given slot with this code: Slot=Trng.pGlobTomb4->pVetMeshSwapSlot[Index]; Note: this selection of slot is a serie of MIP slot of many moveables. Since the _MIP version slot was not so used I thought to use this serie of slot to host mesh swapping outfits. |
| #TEX_SEQUENCE# | 0 / 127 | List of IDs for TextureSequnce= script command used for animated texture |
| #TIME_LIST_128# | 0 / 127 | List of seconds from 0 (endless?) to 127. It could be hosted in (E)xtra parameter of flipeffect and actions but not for Condition triggers |
| #TIME_LIST_32# | 0 / 31 |
List of seconds from 0 to 31. This list will may fit in Button (E)xtra parameter of condition |
| #TIMER_SIGNED# | 0 / 127 |
List of values for timer, positive and negative in the range -64 / +63 First group of values, 1 / 63, are the positive values. While second group of values: 64 / 127, are negative values (-1,-2 ect). To decode the Value of parameter and get the Timer value, you have to use following code: if (Value <= 63) { Timer=Value; }else { Timer = 63-Value; } |
| #TIMER_SIGNED_LONG# | -512 / +511 |
Number of second to set trigger's timer. This value can be positive or negative, anwyay to get valid signed value, from trigger management, you need to perform a test on absolute value you got from Timer (usually) input parameter, since this value will be always positive in the range 0 / 1023 To recognize and convert, further negative values, you should consider that max positive value for timer is +511, i.e. in hexadecimal 0x1FF. This means that, if the value you read is greater than 511, then it should be seen as a negative value and convert it in this way: if (Value <= 511) { Timer=Value; }else { Timer = 511-Value; } |
| #TRANSPARENCY32# | 0 / 31 |
List of transparency intensity. The values of this parameter are mutply by 4 For this reason you should use following code to convert them to real transparency intensity: if (Value == 31) { Transparency= 127; }else { Transparency = Value * 4; } |
| #VAR_LONG_STORE# | 0 / 16 |
List of Long store variables. To get the real variable code you have to add to value of parameter the value 0x1c0 VariableCode = Value + 0x1c0; |
| #VAR_NORMALS# | 0 / 255 |
List of codes of all numeric variables, excluding Store variables The values of this parameter are the same you find in Reference Panel of NG_Center program in Variable Placefolder section. |
| #VAR_STORES# | 0 / 159 |
List of code of Store variables. The codes are the same of Variable Placefolders in NG_Center program |
| #VAR_TEXT# | 0 / 55 |
List of code of Text variables. The codes are the same of Variable Placefolders in NG_Center program |
| #WAD-SLOTS# | 0 / ~500 |
The list of all SLOTs. In the list we'll find values like "LARA", "LARA_SKIN", "MOTORBIKE", "SKELETON" ect |
  1: AddEffect=     1

  2: AddEffect=     2

  3: AddEffect=     3

  4: AddEffect=     4

  5: AddEffect=     5

  6: AddEffect=     6

  7: AddEffect=     7

  8: AddEffect=     8

  9: AddEffect=     9
;------------------ Section for flipeffect trigger: description of the trigger -------------------------------
<START_TRIGGERWHAT_9_O_H>
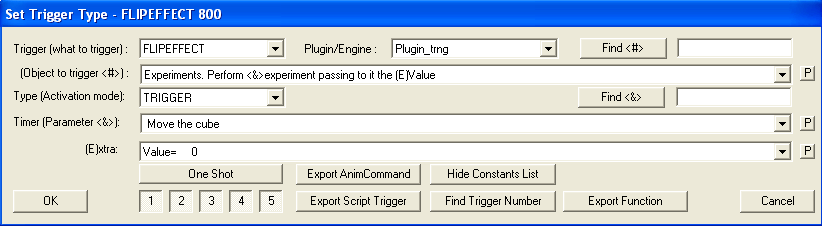
800:Experiments. Perform <&>experiment passing to it the (E)Value
<END>
<START_EFFECT_800_T_H>

1: Move the cube

<END>


<START_EFFECT_800_E_H>

#REPEAT#Value=#0#127

<END>
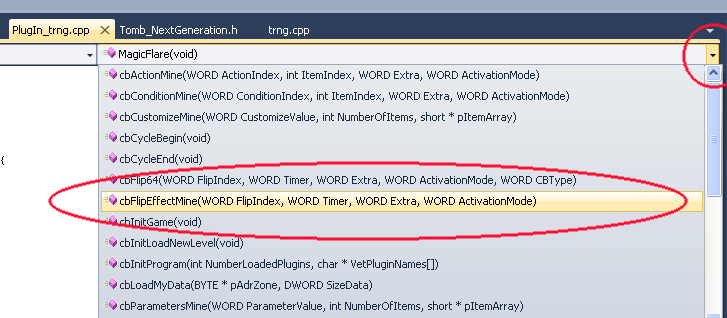
int cbFlipEffectMine(WORD FlipIndex, WORD Timer, WORD Extra, WORD ActivationMode)
          if (ActivationMode & enumSCANF.BUTTON_ONE_SHOT) {

                    // the trigger had One-shot button

          }
// this procedure will be called everytime a flipeffect of yours will be engaged

// you have to elaborate it and then return a TRET_.. value (most common is TRET_PERFORM_ONCE_AND_GO)

int cbFlipEffectMine(WORD FlipIndex, WORD Timer, WORD Extra, WORD ActivationMode)

{

          int RetValue;

          WORD TimerFull;


          RetValue = enumTRET.PERFORM_ONCE_AND_GO;

          // if the flip has no Extra paremeter you can handle a Timer value with values upto 32767

          // in this case you'll use the following TimerFull variable, where (with following code) we set a unique big number

          // pasting togheter the timer+extra arguments:

          TimerFull = Timer | (Extra << 8);


          switch (FlipIndex) {

                    // here type the "case Number:" for each flipeffect number. At end of the code you'll use the "break;" instruction to signal the code ending

          }


          return RetValue;

}
          switch (FlipIndex) {

                    // here type the "case Number:" for each flipeffect number. At end of the code you'll use the "break;" instruction to signal the code ending

          case 800:

                    // Experiments. Perform <&>experiment passing to it the (E)Value

                    break;

          }
case 800:
// Experiments. Perform <&>experiment passing to it the (E)Value
break;
          // if there was the one-shot button enabled, return TRET_PERFORM_NEVER_MORE

          if (ActivationMode & enumSCANF.BUTTON_ONE_SHOT) RetValue= enumTRET.PERFORM_NEVER_MORE;

          return RetValue;
RetValue=TRET_PERFORM_ONCE_AND_GO;
if (ActivationMode & enumSCANF.BUTTON_ONE_SHOT) RetValue= enumTRET.PERFORM_NEVER_MORE;
<START_TRIGGERWHAT_11_T_H>

92:Enemy. Mesh. Flip (E)Mesh of <#>Moveable

<END>
<START_ACTION_92_O_H>

#MOVEABLES#

<END>


<START_ACTION_92_E_H>

#REPEAT#Mesh=#0#63

<END>
// this procedure will be called everytime an action trigger of yours will be engaged

// you have to elaborate it and then return a TRET_.. value (most common is TRET_PERFORM_ONCE_AND_GO)

int cbActionMine(WORD ActionIndex, int ItemIndex, WORD Extra, WORD ActivationMode)

{

          int RetValue;


          RetValue=TRET_PERFORM_ONCE_AND_GO;


          switch (ActionIndex) {

                    // type here the code per your action trigger.

                    // add "case Number:" and complete the code with "break;" instruction

          }

          // if there was the one-shot button enabled, return TRET_PERFORM_NEVER_MORE

          if (ActivationMode & enumSCANF.BUTTON_ONE_SHOT) RetValue= enumTRET.PERFORM_NEVER_MORE;

          return RetValue;

}
          switch (ActionIndex) {

                    // type here the code per your action trigger.

                    // add "case Number:" and complete the code with "break;" instruction

          case 92:

                    // here type the code to manage the action trigger 92

                    // and at end, perform following instruction:

                    break;

          }
          Get(enumGET.ITEM, ItemIndex,0);

          GET.pItem->
<START_TRIGGERTYPE_12_T_H>

21:Creature. Current animation of <#>creature is (E)animation (0-31)

<END>
<START_TRIGGERTYPE_12_T_H>

21:Creature. Current animation of <#>creature is (E)animation (0-31)

<END>

<START_CONDITION_21_O_H>

#MOVEABLES#

<END>

<START_CONDITION_21_B_H>

#REPEAT#Animation=#0#31

<END>
// this procedure will be called everytime a conditional trigger of yours will be engaged

// you have to elaborate it and then return a CTRET_.. value (most common is CTRET_ONLY_ONCE_ON_TRUE)

int cbConditionMine(WORD ConditionIndex, int ItemIndex, WORD Extra, WORD ActivationMode)

{

          int RetValue;


          RetValue=CTRET_ONLY_ONCE_ON_TRUE;


          switch (ConditionIndex){

                    // type here the code for your condition trigger, inserting the code in the section

                    // beginning with "case NumberOfAction:" and ending with row "break;"


          }

          return RetValue;


}
Trng.pGlobTomb4->BaseSalvaFloor.InsideCondition++;
Trng.pGlobTomb4->BaseSalvaFloor.InsideCondition--;
          switch (ConditionIndex){

                    // type here the code for your condition trigger, inserting the code in the section

                    // beginning with "case NumberOfAction:" and ending with row "break;"

          case 21:

                    // type here the code for condition 21

                    break;

          }


}
          Get(enumGET.ITEM, ItemIndex,0);

          GET.pItem->
RetValue |= enumCTRET.EXTRA_PARAM;
return enumCTRET.EXTRA_PARAM | enumCTRET.PERFORM_ALWAYS | enumCTRET.ON_MOVEABLE;
return enumCTRET.IS_TRUE | enumCTRET.EXTRA_PARAM | enumCTRET.ONLY_ONCE_ON_TRUE | enumCTRET.ON_MOVEABLE;