Visual Express 2010 - Installation and Setup
Summary
Introduction
Download Visual Express 2010
You can also using Visual Studio 6.0 to develope plugin projects
Where downloading Visual Studio 6.0 Enterprise
How to install Visual Studio 6.0 on Windows 7.0/8.0/10
In the case you found Visual Studio 2010 express, we go on with infos about installation and setup...
Installation, step by step
Select Visual C++ 2010 express
The usual "Accept conditions" screen
Installation Options
Begin the copy of the files
Restart the computer
Installation Complete
First Execution of Visual Express
Registering the Software
Obtain a registration key online
Verify the registration
Loading in the Visual Express the Plug-in sources
Select the correct source file
Set the correct properties for our project
Set properties to work with "All Configuration"
Set the path of TRLE and TOMB4.exe
Set "Attach": NO
Debugging settings
Set the name for your Plug-in
The syntax for Plug-in names
How to set internal version numbers of your plugin project
Saving the Settings
Introduction
In this document will be explained not only the download and installation of Visual Express 2010 but also the first settings to work with our plugin sources.
Visual Express 2010 is a free product by Microsoft. You have to register your copy but the registration is free.
With this software you can create programs in C++ and in assembly, it has all the necessary features to develope our trng plugin.
Download Visual Express 2010
Currently are working these links to download Visual Express 2010:
Microsoft Site - Visual Express 2010 - iso image (It's an iso image to burn directly on CD)
Soft32 - Visual C++ Express 2010 Free Download
File Hippo - Download Visual C 2010 - Express Edition
Here some other links to download other versions:
Microsoft Visual Studio Express 2012 for Windows Desktop
Visual C++ 2013 Express
You can also using Visual Studio 6.0 to develope plugin projects
I don't suggest this choice, anyway I mean only reminding that it exists...
I added to "PLUGIN_SDK_STORE\plugin" folder two subfolders named:
plugin_trng_start_vc6_sources
plugin_trng_final_vc6_sources
Above two folders, contain VC6 project of:
Start (basic) plugin project (that used at start of Plugin SDK tutorial)
and
Final code at end of tutorial, with all stuff about new Objects like: Cleaner Robot, SW Robot, Cranes, MechWarrior, ect.
About the missing (for VC6 compiler), specific projects (Plugin_MechWarrior, Plugin_Cranes ect), here there is an easy way to modify, one of above VC6 folder, to get same specific plugin for a given object also in VC6 format:
Just you select and copy, from VC2010 folder (with wished sources), the following files:
plugin_trng.cpp
constants_mine.h
macros_mine.h
structures_mine.h
Tomb4Discoveries_mine.h
And then paste them in the Visual C++ 6.0 project folder, to get the specific code in VC6.0 format.
The trick is to copy only source files (like above .cpp and .h) avoiding to copy and replace the Project files (like .dsw, .opt, .sln, .vcxproj, ect)
Remarks:
- You should delete the old "plugin_trng.cpp" source and then rename, when you pasted in to new VC6 folder, the main Plugin_.....cpp" source to "Plugin_trng.cpp"
For instance, if you wish having a VC6 version for Plugin_Cranes VC2010 source, you should copy above files but, since the "plugin_trng.cpp" is missing, you'll copy "Plugin_Cranes.cpp" source and then you should: delete (in target folder) the "plugin_trng.cpp" and at end, rename "Plugin_Cranes.cpp" source, as "Plugin_trng.cpp" source.
- After this conversion job, it's better performing a "Build All" in VC6.0, rather a simple Build Plugin_trng.dll, to avoid some error messages.
Where downloading Visual Studio 6.0 Enterprise
I remember that "Enterprise" release for VC6.0, is like the "Express" release for VC2010, i.e. that "free".
I noticed that it's more easy finding download of Visual Studio 6,0 than Visual Studio 2010 (oddly).
I saw this link, for instance:
Download Visual Studo 6.0 Enterprise in ISO format
Note: the ISO format, means you download a zip file containing and .ISO file. Then you can create a setup CD for visual studio, inserting a blank CD and then clicking with right mouse button on ISO image and chose "Burn on CD this ISO image" (or something alike...).
How to install Visual Studio 6.0 on Windows 7.0/8.0/10
Unfortunately, the installation of Visual Studio 6.0 on last Operative Systems (7/8 and 10) is very problematic.
Anyway, if you own a WindowsXP pc, it will work like a charme, while for others there are on the net some infos about how to do work Visual Studio 6.0 also on newest System.
Here there is one of these documents: How to install Visual Studio 6 on Windows 10
In the case you found Visual Studio 2010 express, we go on with infos about installation and setup...
Note: probably you'll have to scroll the above page to reach the section "Visual Studio 2010 Express".
The first downloads are for last visual studio download but I cann't grant that they are really forever-free.
For instance the "ultimate", "premium" or "professional" releases have only a free period trial but they are not forever-free. You should choose an "express" release.
About other (more up to date releases) of express version, I can only say that visual 2010 is last release to support yet Windows XP operative system and I believe it was a good thing.
In this page, select the link for "visual C++ 2010 Express" (please don't confuse it with Visual C## 2010 Express, it is another kind of compiler)
In the case above link doesn't work when you are reading this document, you can look for the download with google, setting keywords "download visual studio express", to locate the last version of Visual Studio Express products.
Installation, step by step
I'll show the steps I did to install my download, anyway I'had downloaded an iso image (to build a CD) with all visual studio express programs.
In the case you are installing only Visual C++ Express 2010 (or more recent version), some image could be different.
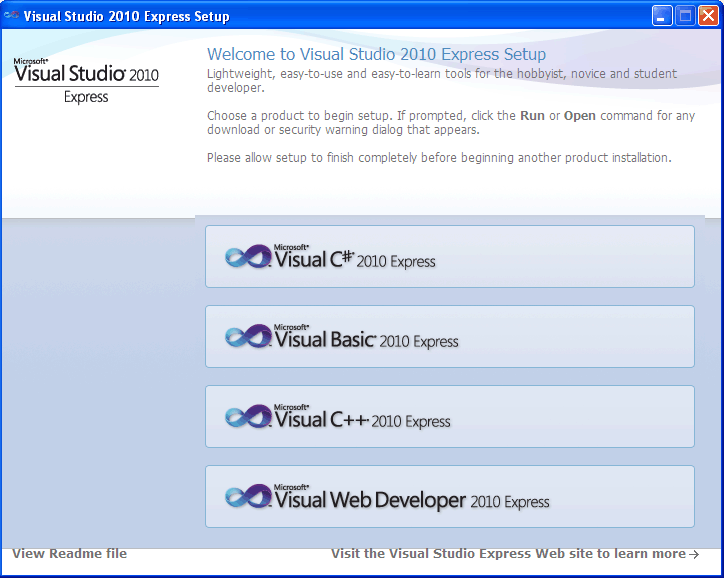
Select Visual C++ 2010 express
If you are using the CD built with the .iso image of all visual studio express tools, you'll have following screen.
You have to install only "Visual C++ 2010 express".
About Visual Basic 2010 express, it could be useful to create an extern program to link to the NG_Center program, anyway it's not necessary for our plugin.
The usual "Accept conditions" screen
Click on "I have read and accept the license terms", and then click on [Next] button

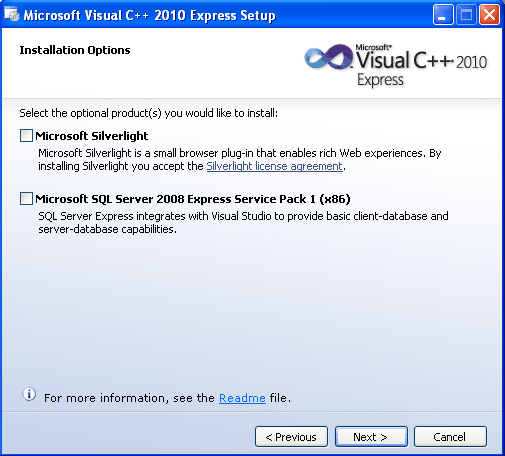
Installation Options
I suggest to uncheck both options.
The "SilverLight" and "SQL server" are not useful for our targets.
The silverlight is a browser while SQL server is a data base management software.
You can uncheck both, and click on [Next] button
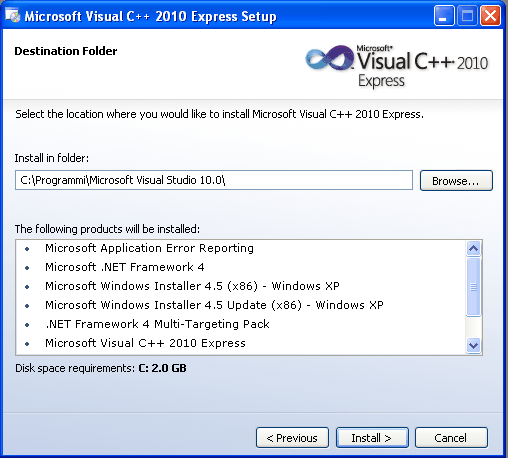
Begin the copy of the files
Now you see the sub-tools that will be copied togheter with Visual Express 2010.
You cann't deselect them but you can change the destination, on your disk, where to install the program.
Now click on [Install] button. This phase will require some time...
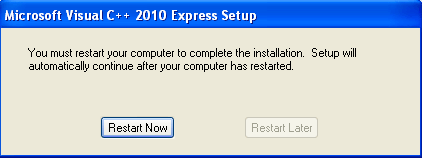
Restart the computer
Before the installation is complete, you'll be prompted to restart the computer. Then, after the restart, the installation will be completed.
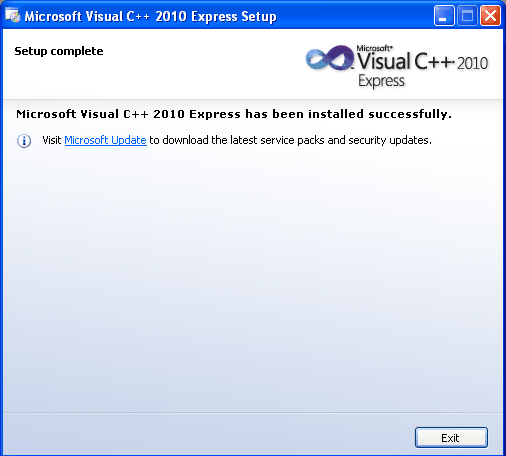
Installation Complete
After the restart the installation will be completed.
When you see below window, you can click on the [Exit] button.
First Execution of Visual Express
Now we have to locate the program group in the Start menu.
Click on [Start] menu and choose the Visual Express 2010

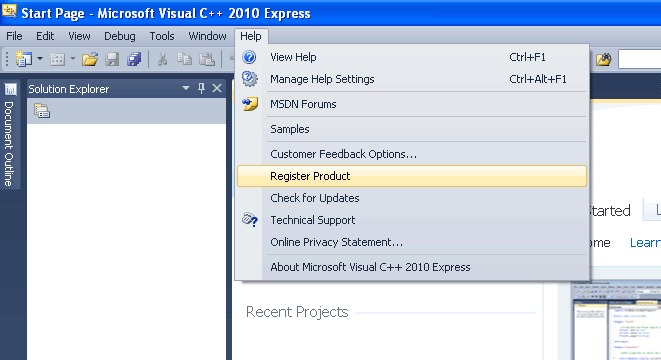
Registering the Software
The copy of Visual Expres you installed has a trial time of 30 days, anyway once you registered it (for free), it will work forever.
So, the first step is to registrate your copy.
Click on "Help" menu and select the item "Register Product"
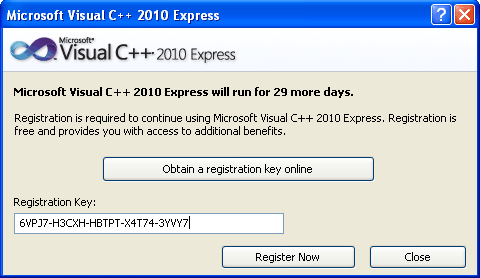
Obtain a registration key online
Click on the button [Obtain a registration key online].
You'll go on the Microsoft website, where you have to regisrate the product.
Pratically it will be you, to be registered on the Microsoft website, but ok...
You have to type a valid email address, because you'll receive the Registration Key, via email.
Curiosly I received the registration key, before completing the registration phase, anyway pheraps now that bug has been fixed.
When you have the registration key, type it, in the white space below the label "Registration Key" and click on [Register Now] button.
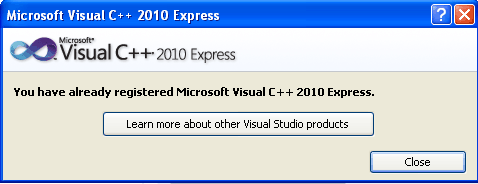
Verify the registration
Oddly, there is no message to inform you that the registration has been performed, so we have to verify in other way.
Choose newly the "Help" menu and select the item "Register Product".
If the previous registration has had success you'll see this window:
Loading in the Visual Express the Plug-in sources
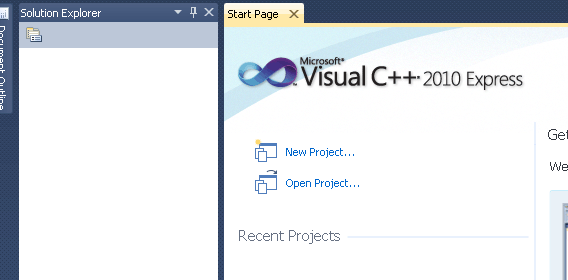
Now in the main window, in the frame "Start Page", click on the text "Open Project".
Note: in the future you'll be able to reload fastly the plugin from the section "Recent Projects"
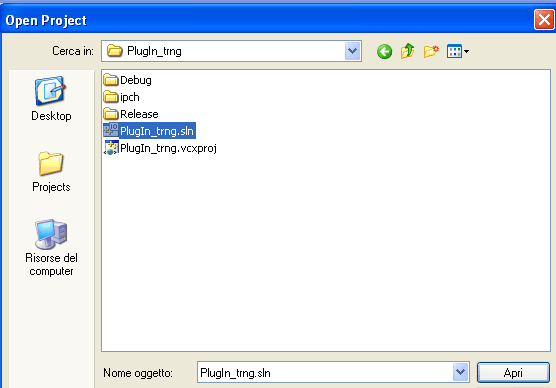
Select the correct source file
In the browse window, you have to navigate in your PC, to locate the folder with your plugin sources.
Note: I remember that you find the starting plugin project to load in "PLUGIN_SDK_STORE\Plugin\plugin_trng_start_vc2010_sources" folder.
Once you found it, open it, and choose the file "Plugin_trng.sln" (.sln = SoLutioN file)
Now click on [Open] button and after some second, the sources willl be loaded.
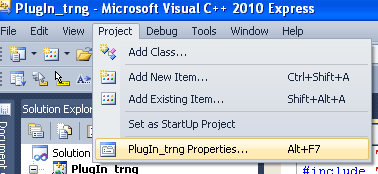
Set the correct properties for our project
I had already set the most of properties with ideal values, anyway there are some settings, like those about the disk path for tomb4.exe, that you have to set now.
Choose from "Project" menu the item "Plugin_trng properties".
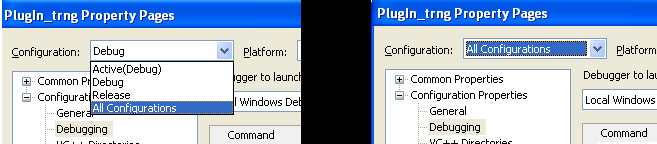
Set properties to work with "All Configuration"
Now click on "Configuration Properties" and then, in top/left corner, you find the "Configuration" field , click this and select "All Configurations"
Set the path of TRLE and TOMB4.exe
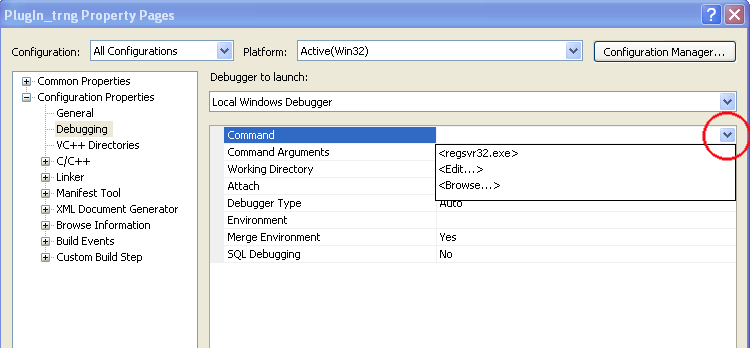
Select in left side, the setting path: "Configuration Properties", "Debugging".
Now click on the down arrow (see the red circle in the picture), and choose the "Browse" option.
You have to perform same operation for the "Command" row and the "Working Directory"
For the "Command", browse your disk and select the "tomb4.exe" file you'll use to test your trng plugin.
For the "Working Directory", browse and select the TRLE folder where there is the above "tomb4.exe" file.
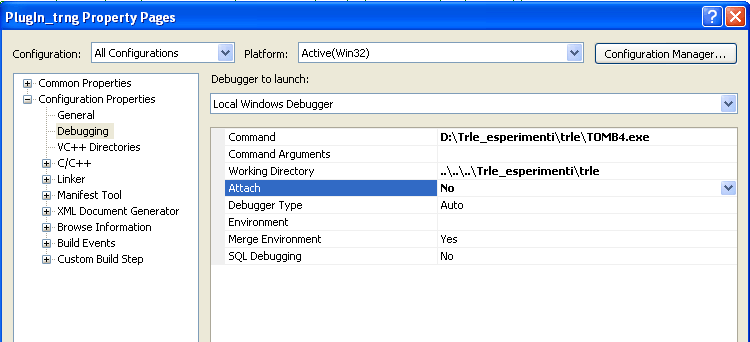
Set "Attach": NO
Now set the setting about "Attach" and select "No".
If you performed in correct way these operations the Properties window should be like the following but with your Tomb4.exe and TRLE path, of course.
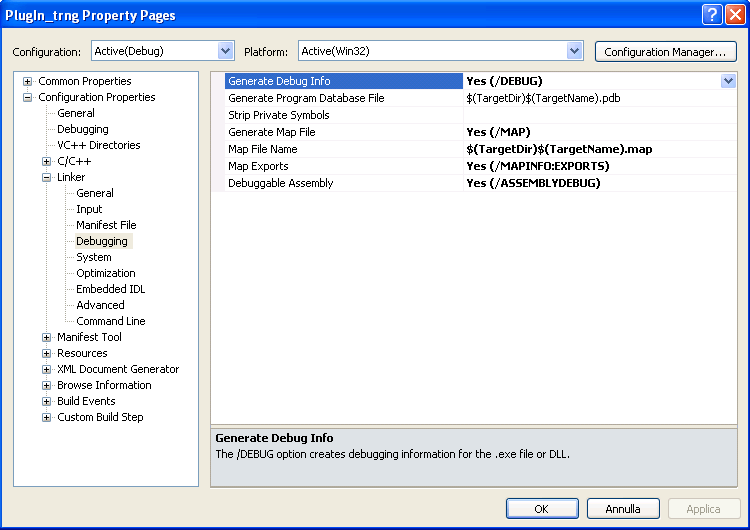
Debugging settings
It is important you set some debugging settings, in particular way that about creation and position of plugin_trng.map file.
With Configuration: (Debug), click in left side on Linker->Debugging and try to set same settings you see in belove image:
Set the name for your Plugin
This matter of plugin renaming is interesting and you should take care about better choice for you, in according with following cases:
- If you mean (advisable choice) to follow the plugin_sdk.htm tutorial, starting from sources in "PLUGIN_SDK_STORE\Plugin\plugin_trng_start_vc2010_sources" folder, it's better you don't rename "plugin_trng" name, since all help and demo files have been created to work with that name
- When you are going to create your own plugin, it's better you rename it, of course, since we don't want plenty of plugins all named in same manner.
In this case you have three different chances:
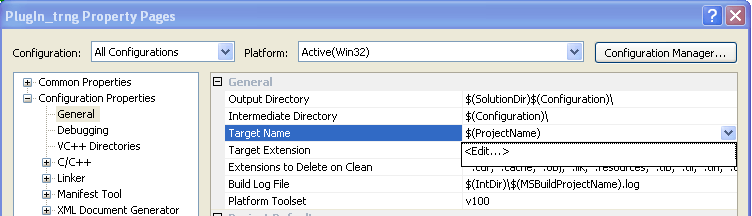
- Change only the "Target Name" setting.
In this way all sources will have yet same "plugin_trng" name, but when you built your dll, it will have new name you chose.
- Let unchanged Plugin_trng name while you are developping the project only on your (local) pc, while, when you completed your job, just only in that moment, rename "plugin_trng.dll" file with another name, and, in same manner, also other .script, .btn, .ocb files, of course
- Let as "Target Name" the setting "$(ProjectName)" macro and then rename pysically all sources and internal names with your new name.
To perform this operation you can use the menu command "Tools->Rename Plugin VC2010 Project" of TrngPatcher program.
The advantage of this choice is to have in Visual C++ 2010 editor, different names instead of a list of "plugin_trng" shortcuts, that you could distinguish only for their folder.
In the case you chose "1." point of above list, you can realize that in this way:
Select in the left side the settings path: "Configuration Properties", "General".
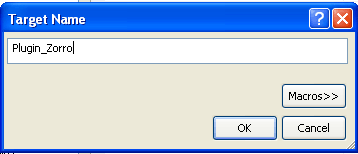
In the right, side, click on the down arrow of the "Target Name" row, and choose "<Edit...>"
The syntax for Plug-in names
You should choose a name that identify you or the name of your work.
Anyway the library of the plugin has to begin with "Plugin" text, and to have the ".dll" extension, because these text patterns are those that allow, at trng core, to recognize a plugin library to load and perform.
For this reason, the name you type has to begin with characters "Plugin".
NOTEs:
- Do not add to the name the extension ".dll" because it will be added to the plugin name by the compiler itself.
- Do not use blanks (spaces), dots (period), accented vocals and more generally non us/en standard charset letters, and neither interpunction character in the name.
Pratically you can use only letters ("@" is not a letter) , digits and underscore "_" characters.
- The max lenght for plugin name (excluding the ".dll" extension) is 63 characters (or 67 enclosing the ".dll" extension in the computation) .
- The plugin names are not case sensitive, this means that names like "plugin_Mephisto" , "Plugin_mephisto" or "PLUGIN_MEPHISTO" will be the same for trng engine.
- You cann't use same name chosen by other plugin's authors, of course.
Some examples of legal plugin names:
"Plugin_JFK"
"pluginSuperCrash2015"
"Plugin_SarahSilverman"
ect.
Type the wished name and click on [Ok] button.
How to set internal version numbers of your plugin project

Really, it's not important set immediatly the version infos but it will be necessary when you'll share your plugin with other people (level builders, players) to give to them data about current version of the plugin built-in in the dll file.
If you wish change immediatly the internal version numbers of your project see How to change Version Numbers page.
Saving the Settings
Now we have to click on [Apply] button, and then on [Ok] button to close the "Plugin_Trng properties" window.
Now close also the Visual Express 2010 program, and when you will be prompted about to save the plugin_trng project and its settings, you answer: "Yes"
That's all.